10 Common Piano Technique Mistakes
Learning Focus
Music Style
Free Lessons
Get free weekly lessons, practice tips, and downloadable resources to your inbox!
Do you want to know one of the biggest practice secrets to getting a better piano sound? Look beyond the notes! If you need proof, just listen to any computer-generated piano performance and you’ll immediately hear that correct notes alone are uninspiring. Instead, it’s the human touch that brings a performance to life. So how can you sound more human and less mechanical in your playing? The secret is to examine your movements! After all, it is a pianist’s movements that convert the written score into audible sounds? That’s why in today’s Quick Tip, Jonny will introduce you to 10 Common Piano Technique Mistakes. These pesky little habits are “the usual suspects” behind poor piano technique that leads to mistakes and limitations. Fortunately, these mischief-makers can be eliminated once you know how to spot them. This lesson covers:
Now, let’s get ready to take a closer look at this line up to see if any of these shady characters are lurking in your piano playing.

Intro to Piano Technique
What do we mean when we speak of piano technique? Well, technique describes one’s ability (or lack thereof) to efficiently control the anatomical mechanics needed to produce precisely desired sounds. Therefore, a pianist with strong or solid technique plays with remarkable clarity and consistency. Other the other hand, pianists with poor or sloppy technique have inefficient movements and lack control over the sounds they seek to produce. To put it another way, your piano technique is the sum of your physical capabilities and limitations at the instrument.
There are four main playing mechanisms involved in piano technique: (1) the fingers, (2) the hands, (3) the forearms and (4) the upper arms. These four mechanisms may be used in insolation or in various combinations. Pianist and author William S. Newman explains that each mechanism involves two components—a lever and a hinge. “The lever itself is the finger, or the hand, or the forearm, or the upper—that is, full—arm. Its fulcrum, or hinge, is the knuckle, wrist, elbow or shoulder, respectively.” ¹
There are countless volumes of piano etudes and technical studies devoted to exploring, isolating and refining the movements within each mechanism. In fact, you may have even played a few of theses exercises yourself. Some of the most popular composers of technical studies for pianists are Charles-Louis Hanon (1819–1900), Carl Czerny (1791–1857) and Friedrich Burgmüller (1806–1874).
Hanon
The Virtuoso Pianist–No. 1
Czerny
Daily Exercises–No. 6
Burgmüller
25 Progressive Pieces–No. 1
Why is piano technique important?
Piano technique is important for all students because it is difficult to produce good piano sounds using poor mechanics. In addition, improper piano technique is a root cause behind many common mistakes in performance. Furthermore, poor technique can even lead to serious injury!
The purpose of today’s lesson is to help students of all levels, especially beginners, identify the some of the most common piano technique mistakes and how to fix them. Generally speaking, these mistakes are easy to spot and also easy to remedy.
Before we take a look at our first example, be sure download the lesson sheet PDF. This resource appears at the at bottom of this page after logging in with your membership. You can also easily transpose these examples to any key using our Smart Sheet Music.
The 10 Common Piano Technique Mistakes
Many piano technique mistakes for beginner students stem from poor fingerings. Usually, poor fingerings for beginners are not so much the result of conscious decisions. Rather, beginners tend to lack attentiveness to fingering considerations altogether. As a result, they may ignore good editorial fingering suggestions that appear within a score. In addition, students who have not yet begun playing scales, arpeggios and other technical studies generally lack the benefit of strong fingering intuition.
If you are brand new to the piano, be sure to check out our Introduction to the Keyboard (Level 1) course. In this full-length course, you’ll learn note names, stretches, exercises, proper technique, note/chord reading, improv and how to practice.
Also, our All Major and Minor Scales Reference (Level 2) Smartsheet is an essential guide for learning to play scales with the proper fingerings. In fact, the habits formed by regular scale practice is one of the best ways to avoid bad fingerings altogether.
Now, let’s take a look at some poor fingerings.
#1: The Balance Beam
“The Balance Beam” involves using the thumb on a black key when playing a melody, as in the following example.

Since the thumb is so much sorter than the other fingers, it’s more natural from an ergonomic perspective to use the longer fingers (2nd, 3rd, 4th…even 5th) to play the black keys. In fact, playing a melody with the thumb on a black key feels just about as dicey as a walking on a balance beam. Remember, this principle applies specifically to melodic playing only. Chordal playing, on the other hand, frequently requires the thumb to play on the black keys.
The Fix: Put Thumb on White Notes
Now, let’s look at that same example with a more pianistic fingering approach. Most melodies containing black keys, including the one below, do not contain all black keys. Therefore, placing the thumb a white key usually results in the most comfortable and efficient fingering option.

That’s much better. Let’s look at another example.
#2: The Awkward Relationship
“The Awkward Relationship” results when a piano student crosses their fingers in an unconventional manner. In the following example, the left hand features a descending chromatic line. The red circles show instances of “The Awkward Relationship” in which a pianist incorrectly crosses the 2nd finger over the 3rd finger.

The Fix: Use The Thumb to Cross Under
Instead of crossing 2 over 3, the thumb is able to cross under the 3rd finger quite naturally. Try playing the same example with the following fingering.

The fingerings in the example above are drawn from on the standard piano fingering for the chromatic scale. You can learn all about these fingers in our Pro Piano Improv with the Chromatic Scale (Level 2) Quick Tip.
Now, let’s examine a pesky habit of a different kind.
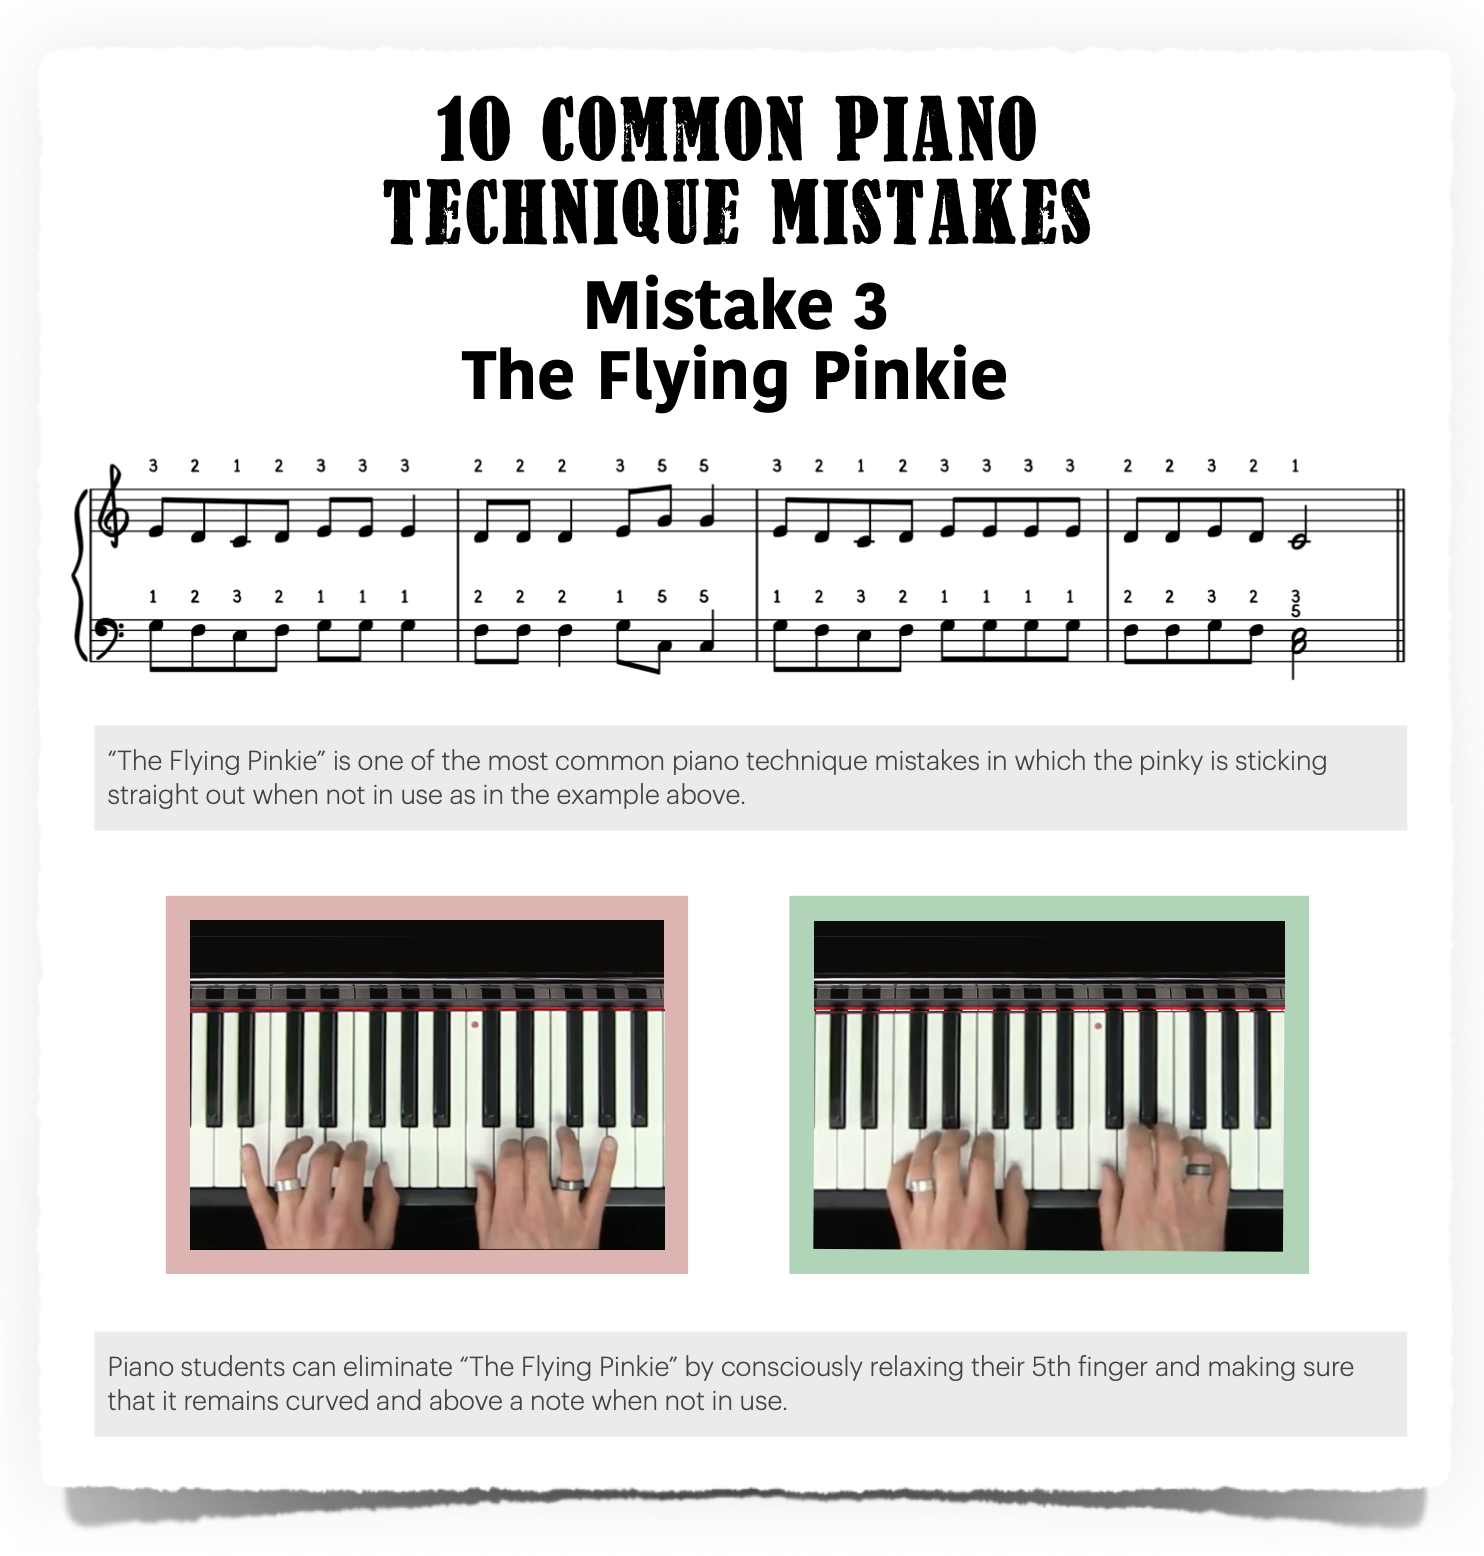
#3: The Flying Pinkie
Many pianists of all levels play with “The Flying Pinkie.” This poor technical habit involves keeping the pinkie fully extended and sticking straight out when not in use. For example, try playing the following example, which contains very few notes that use the 5th finger. How does your pinkie behave when not in use?

The Fix: Keep Pinkies Curved and Above a Note
The remedy for “The Flying Pinkie” is to consciously relax your 5th finger and make sure that it remains curved and above a note when note in use.
#4: The One-Finger Hog
“The One-Finger Hog” is especially common among younger piano students. In the example below, for instance, the 2nd finger hogs nearly all the notes of the melody.
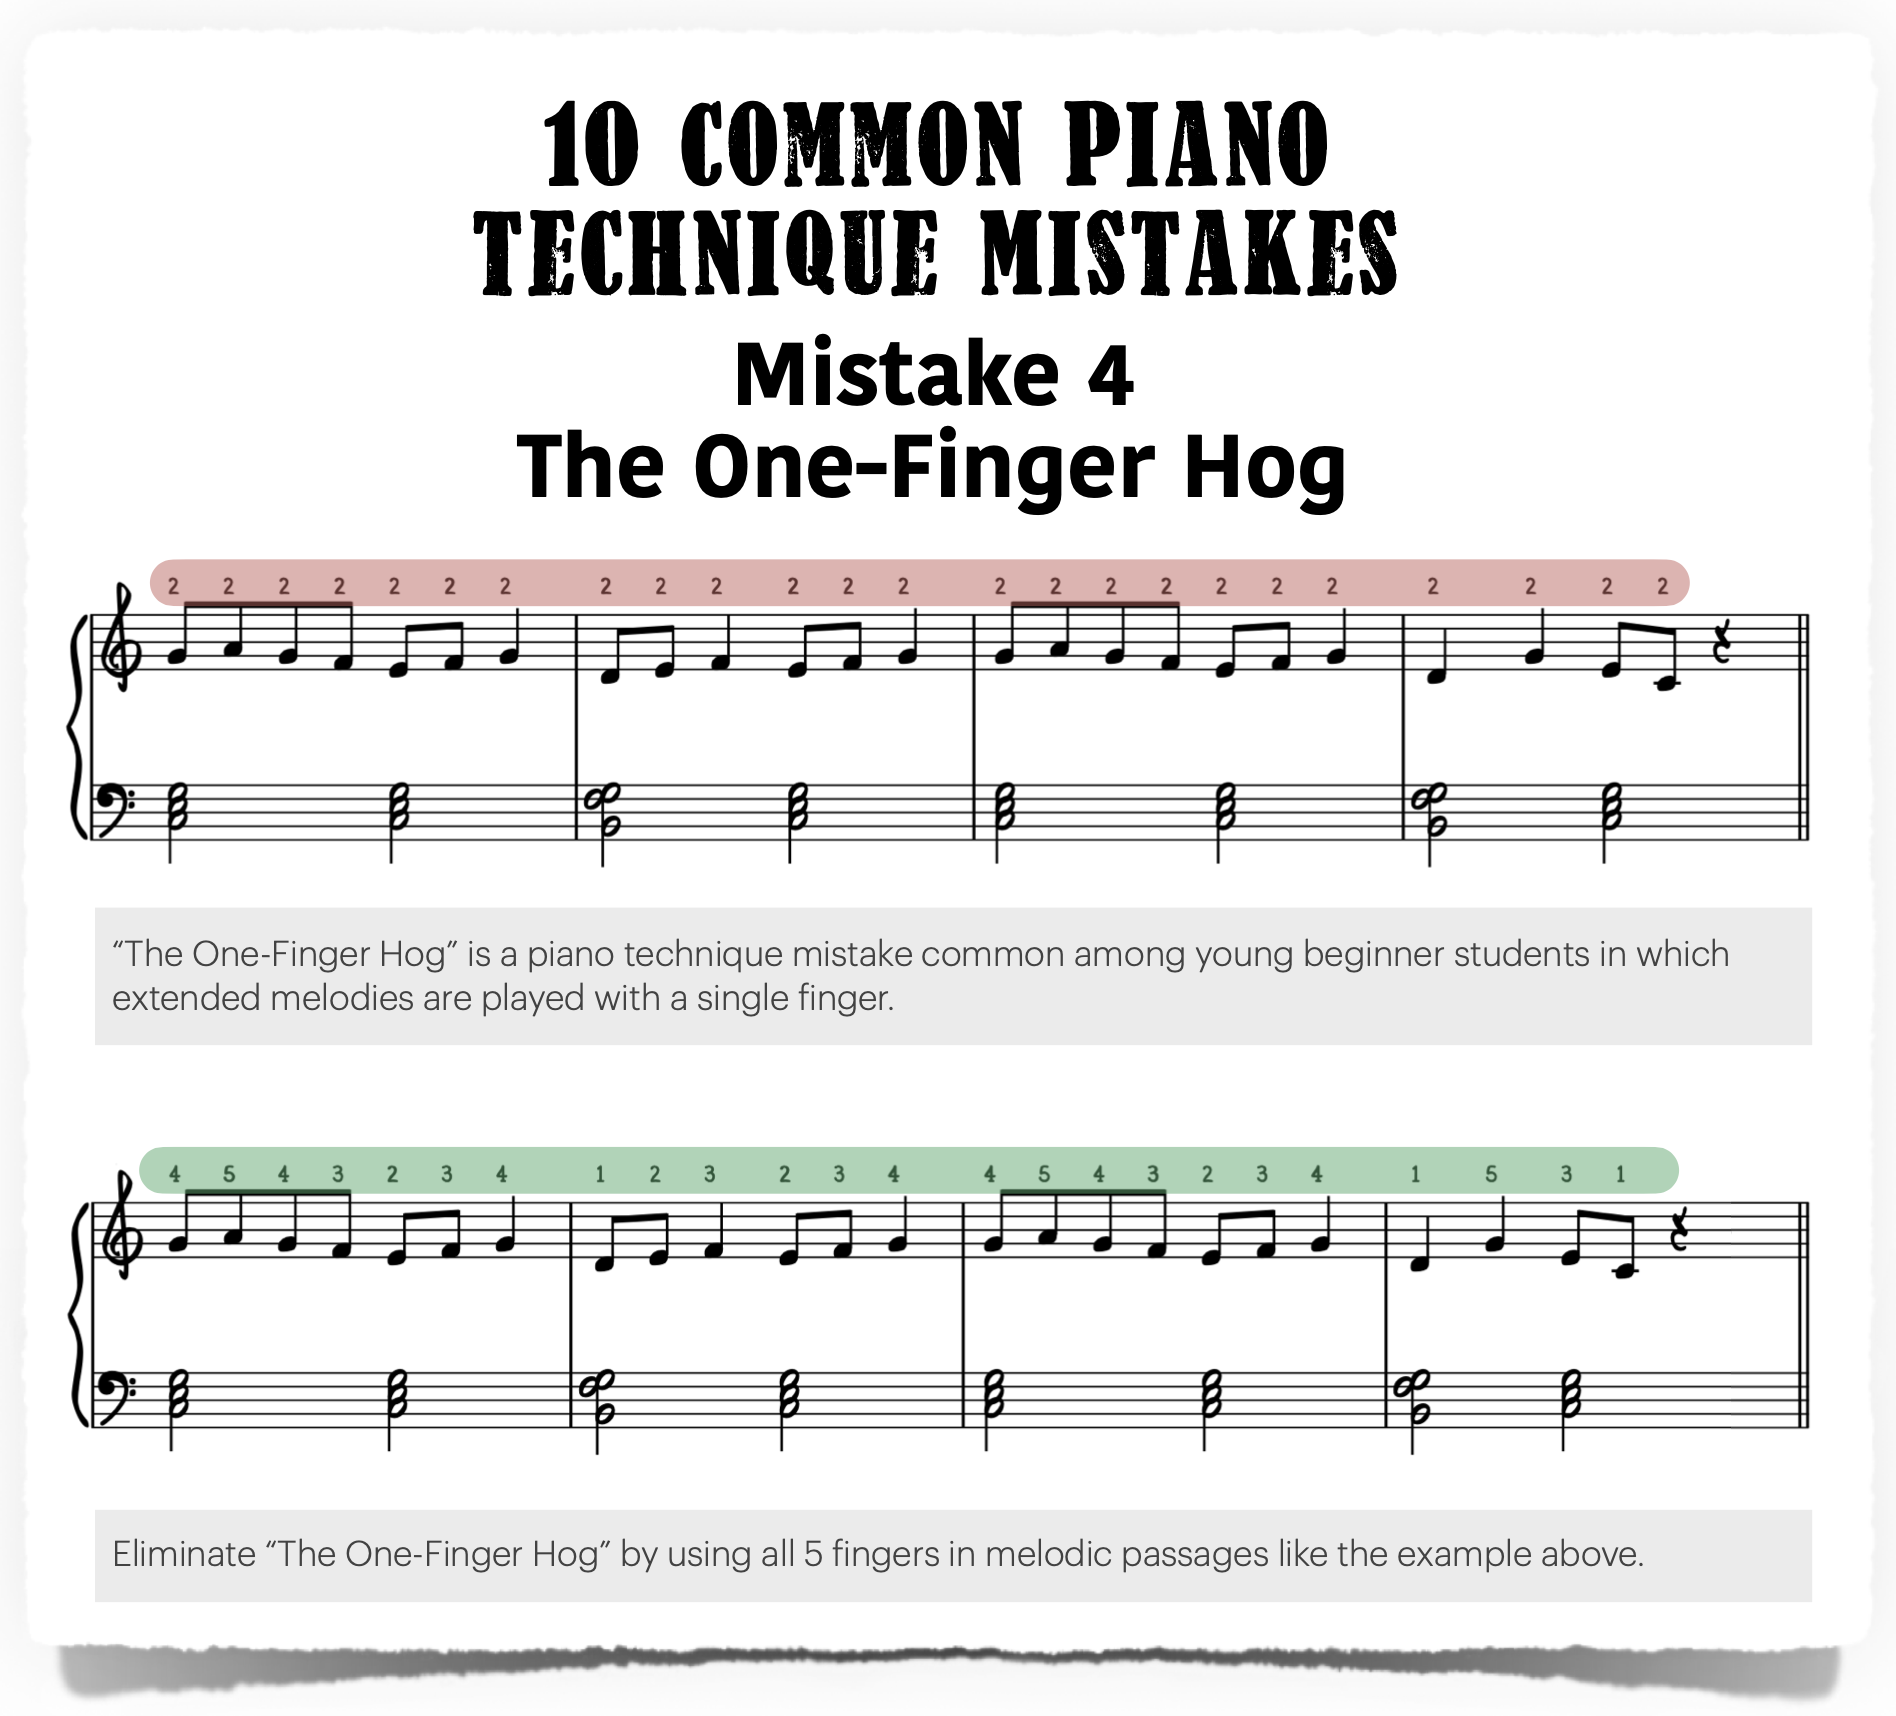
While the example above is rather extreme, it’s common among young children who have not had any formal piano training.
Sometimes students who have had piano lessons still rely on a more subtle version of “The One-Finger Hog,” only in their case, it’s more like “The Three-Finger Hog.” That’s right, many players have a tendency to rely too heavily on fingers 1 ,2 and 3.
The Fix: Use All 5 Fingers
Since when have five fingers on each hand, we should play with all of them! Of course, this is not to imply that we ought to use all five fingers arbitrarily. Specifically, melodies like the following example, which extend beyond the range of a 5th interval, should generally be played with all five fingers.

#5: The Overambitious Finger
Next, we have “The Overambitious Finger.” This piano technique mistake is similar to “The One-Finger Hog,” except that is deals specifically with repeated notes. Try playing the following example with an overambitious index finger as indicated.
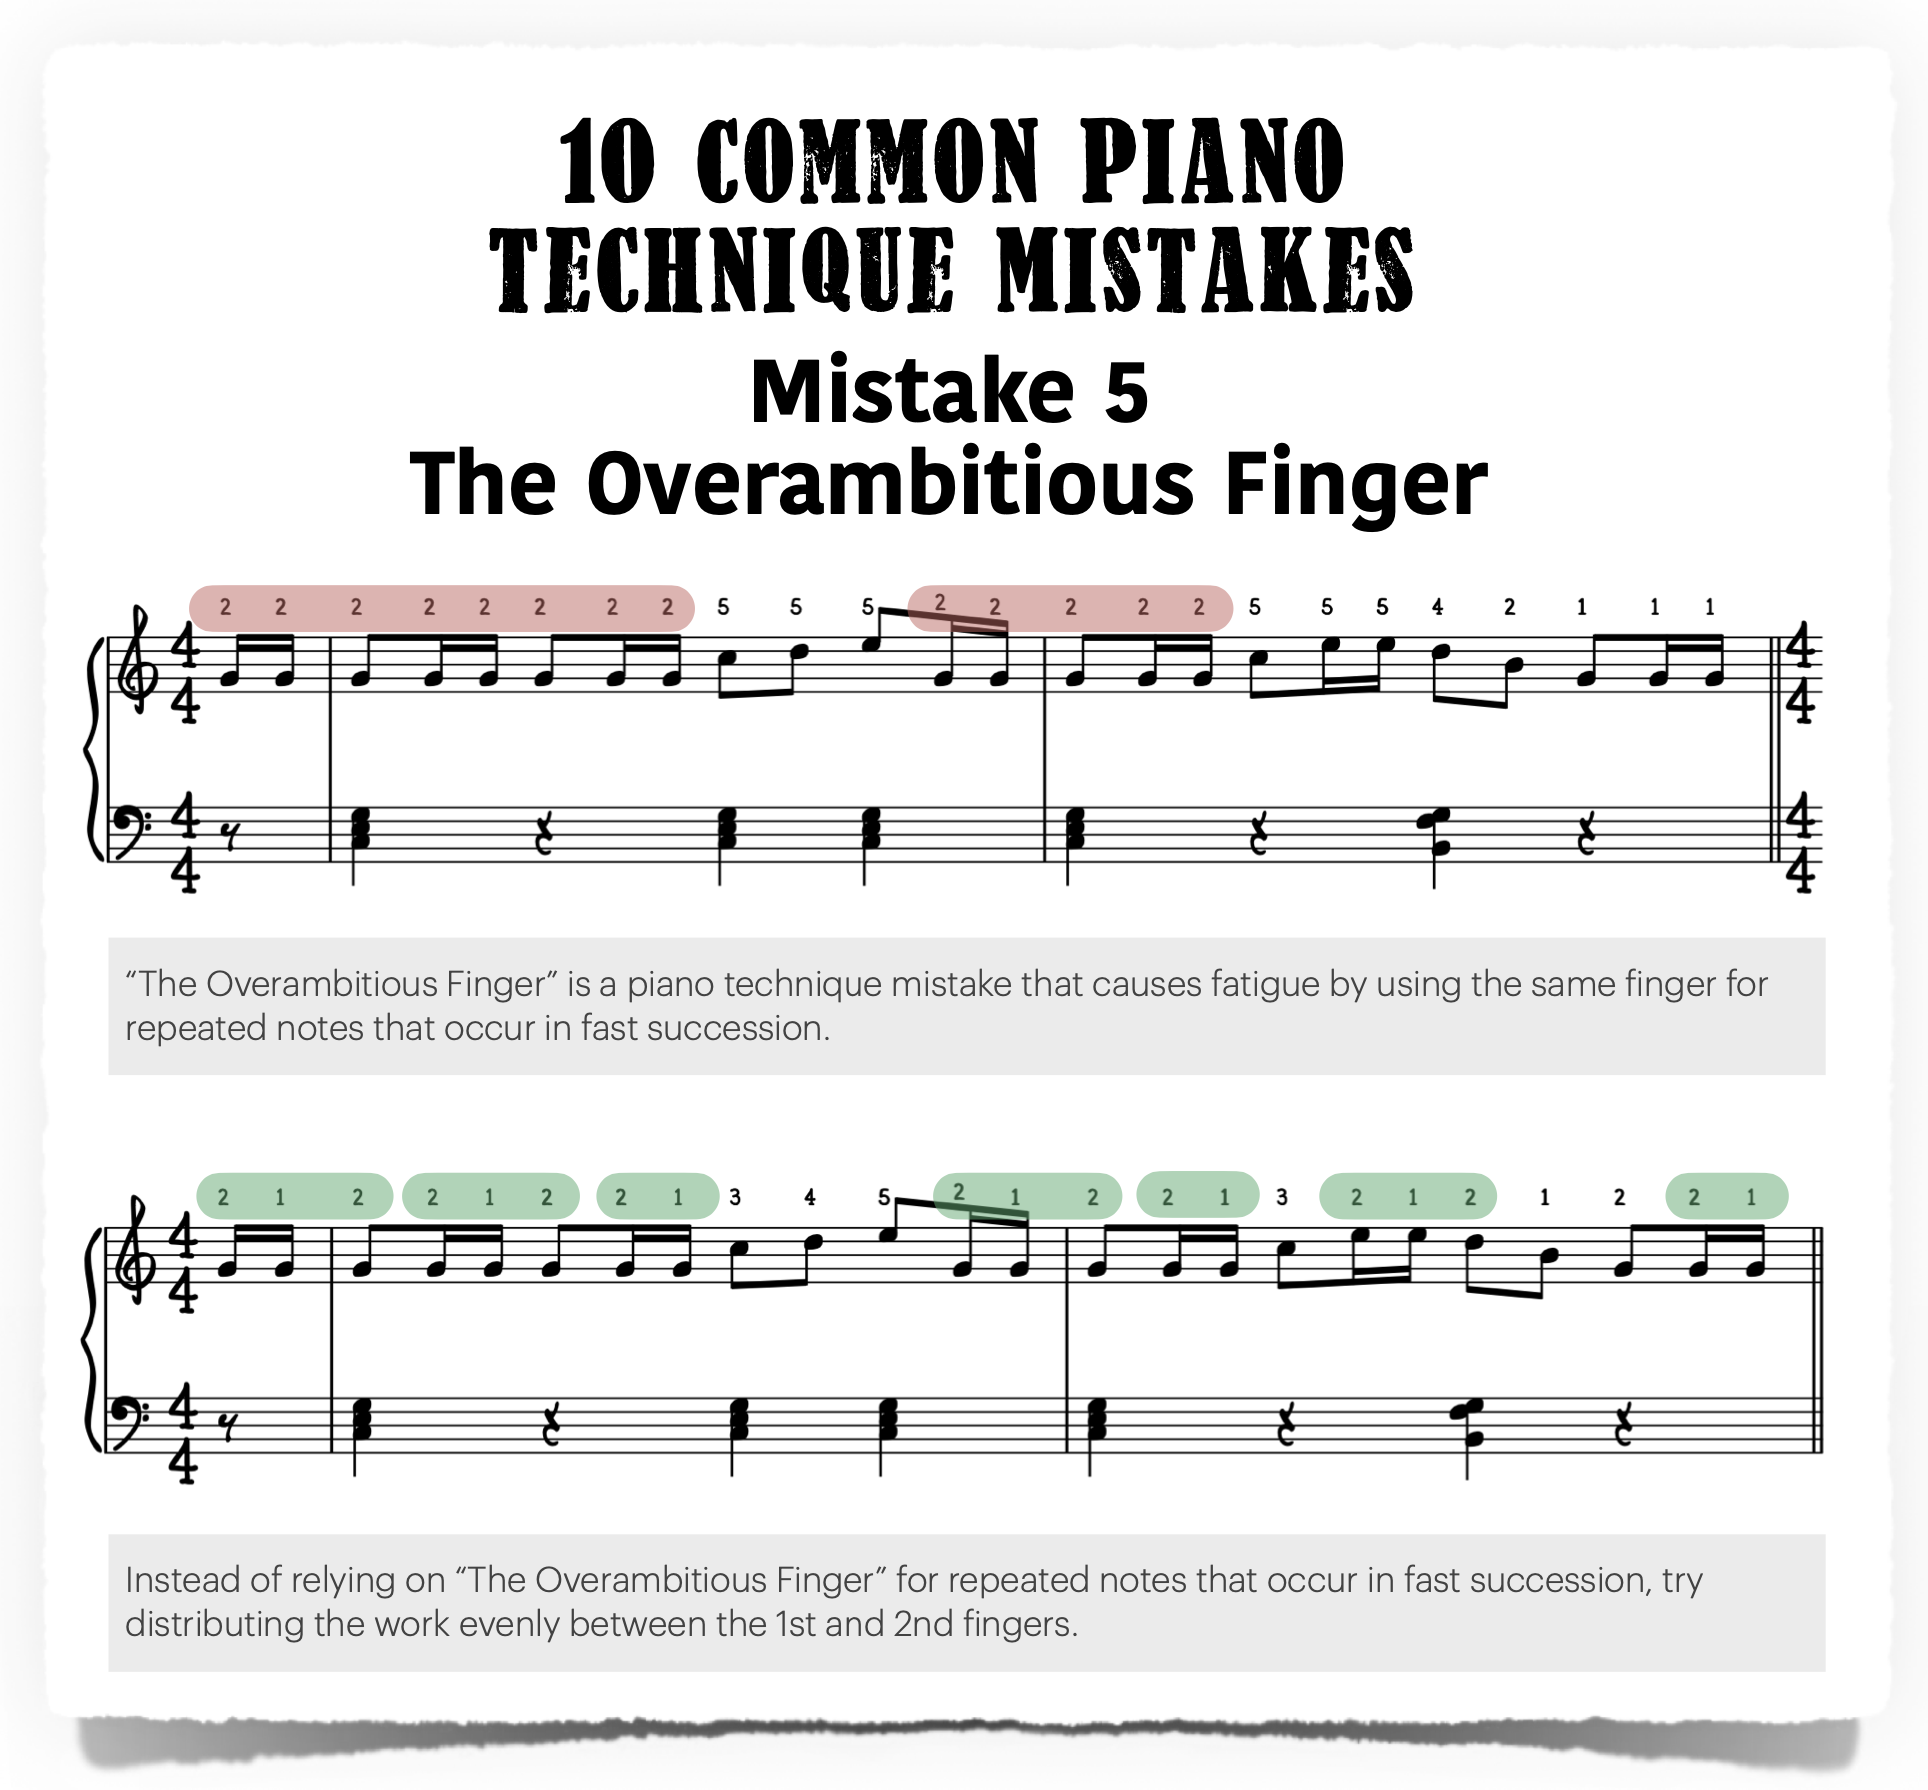
As you can see, using the same finger for repeated notes that occur in rapid succession gets fatiguing rather quickly.
The Fix: Use Fingers 1 and 2 on Repeated Notes
Now, try playing the same passage with the 1st and 2nd fingers instead, as indicated below . This fingering allows for greater comfort and relaxation in the wrist, even at faster speeds.

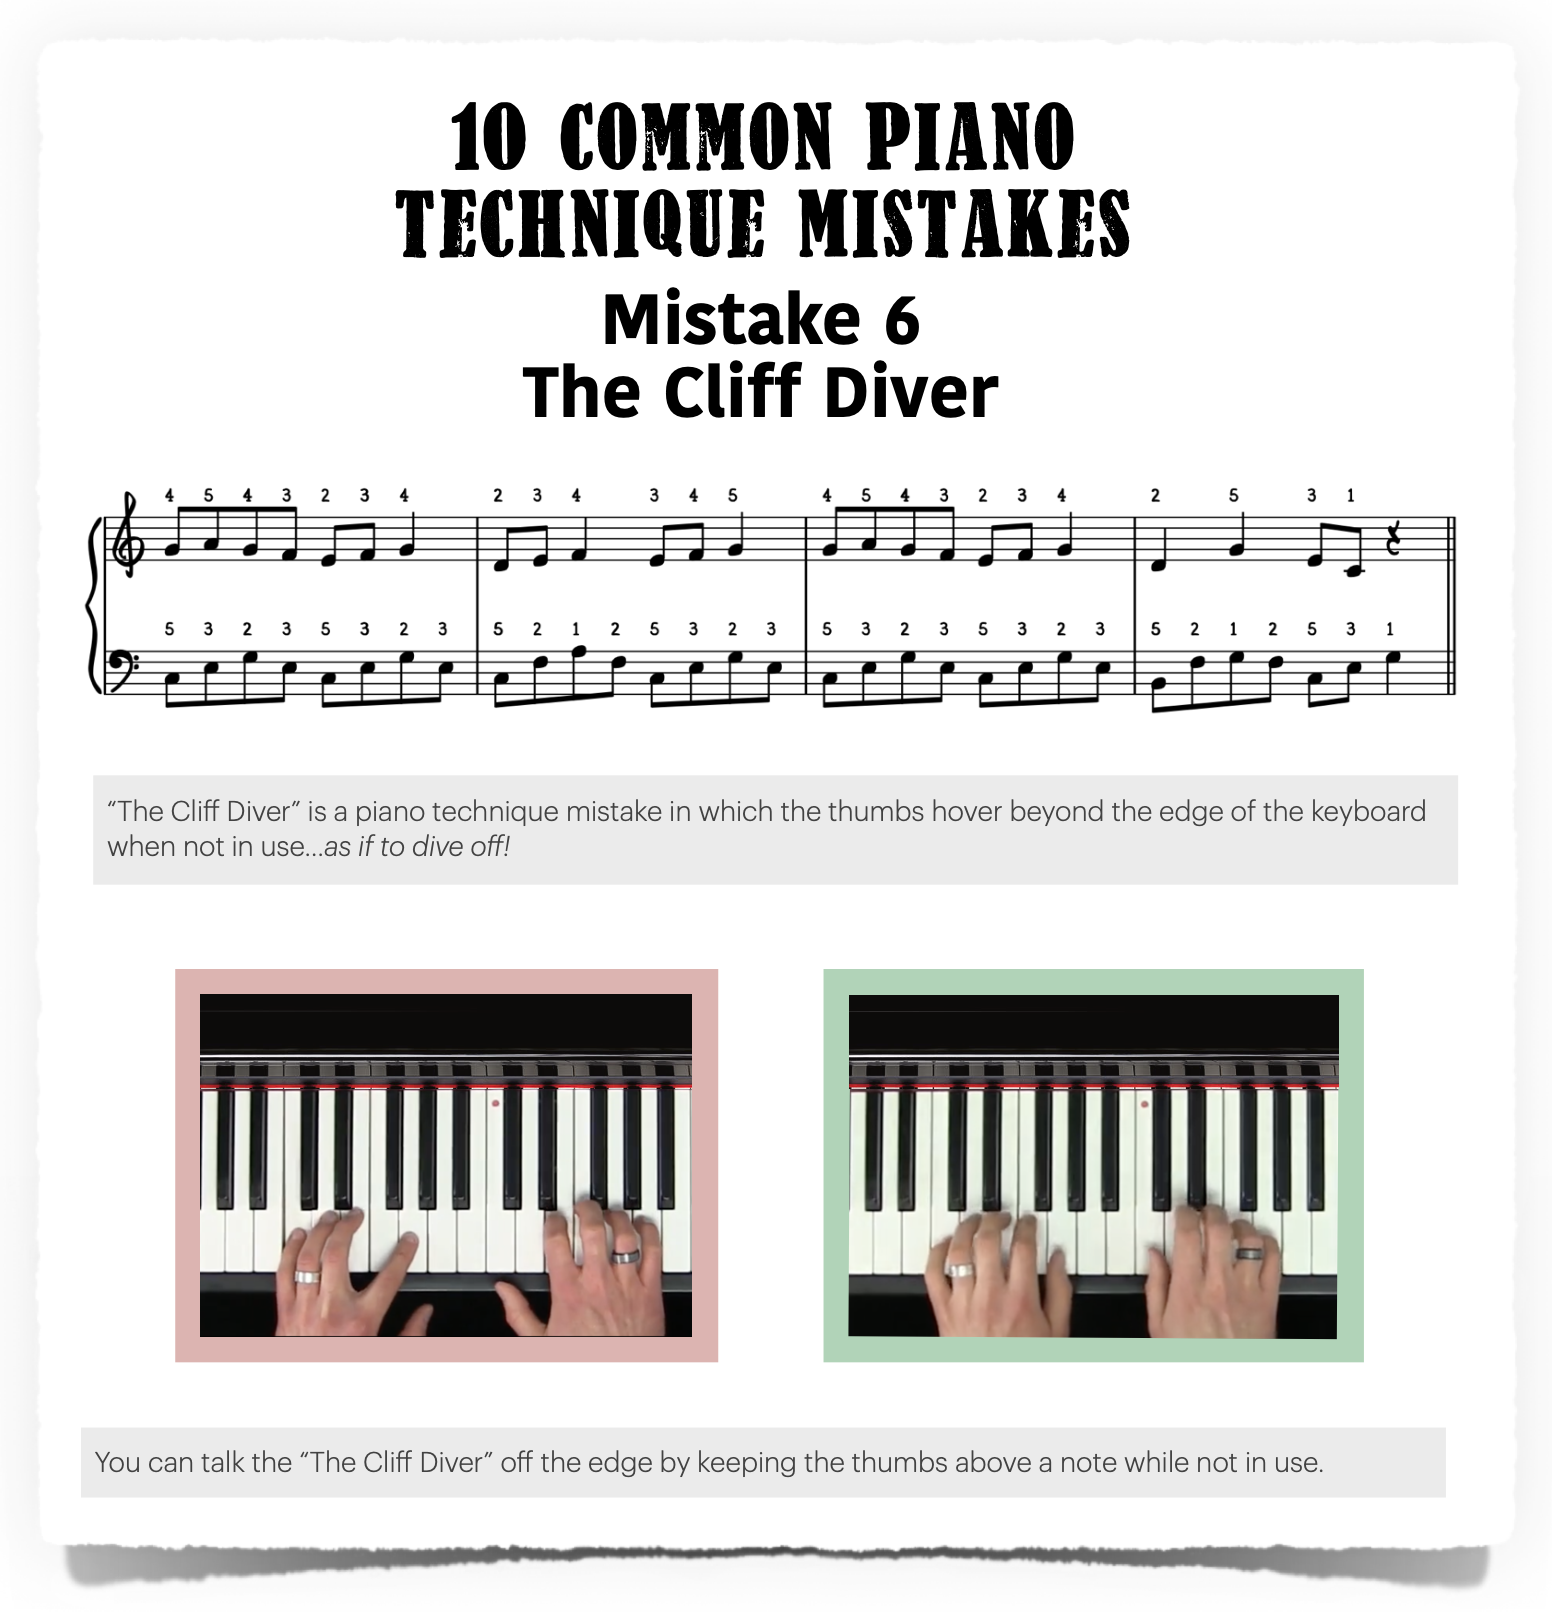
#6: The Cliff Diver
Another common piano technique mistake among beginners is “The Cliff Diver.” This describes the habit of allowing the thumbs to hover beyond the edge of the keyboard when not in use…as if to dive off!
Try playing the following example, which requires very little use of the 1st finger, and observe where your thumbs are most inclined to “hang out” when not in use. Do you need to talk them off a ledge?

The Fix: Keep Thumbs Above a Note
The remedy for “The Cliff Diver” is to be sure to keep your thumbs above a note when note in use.
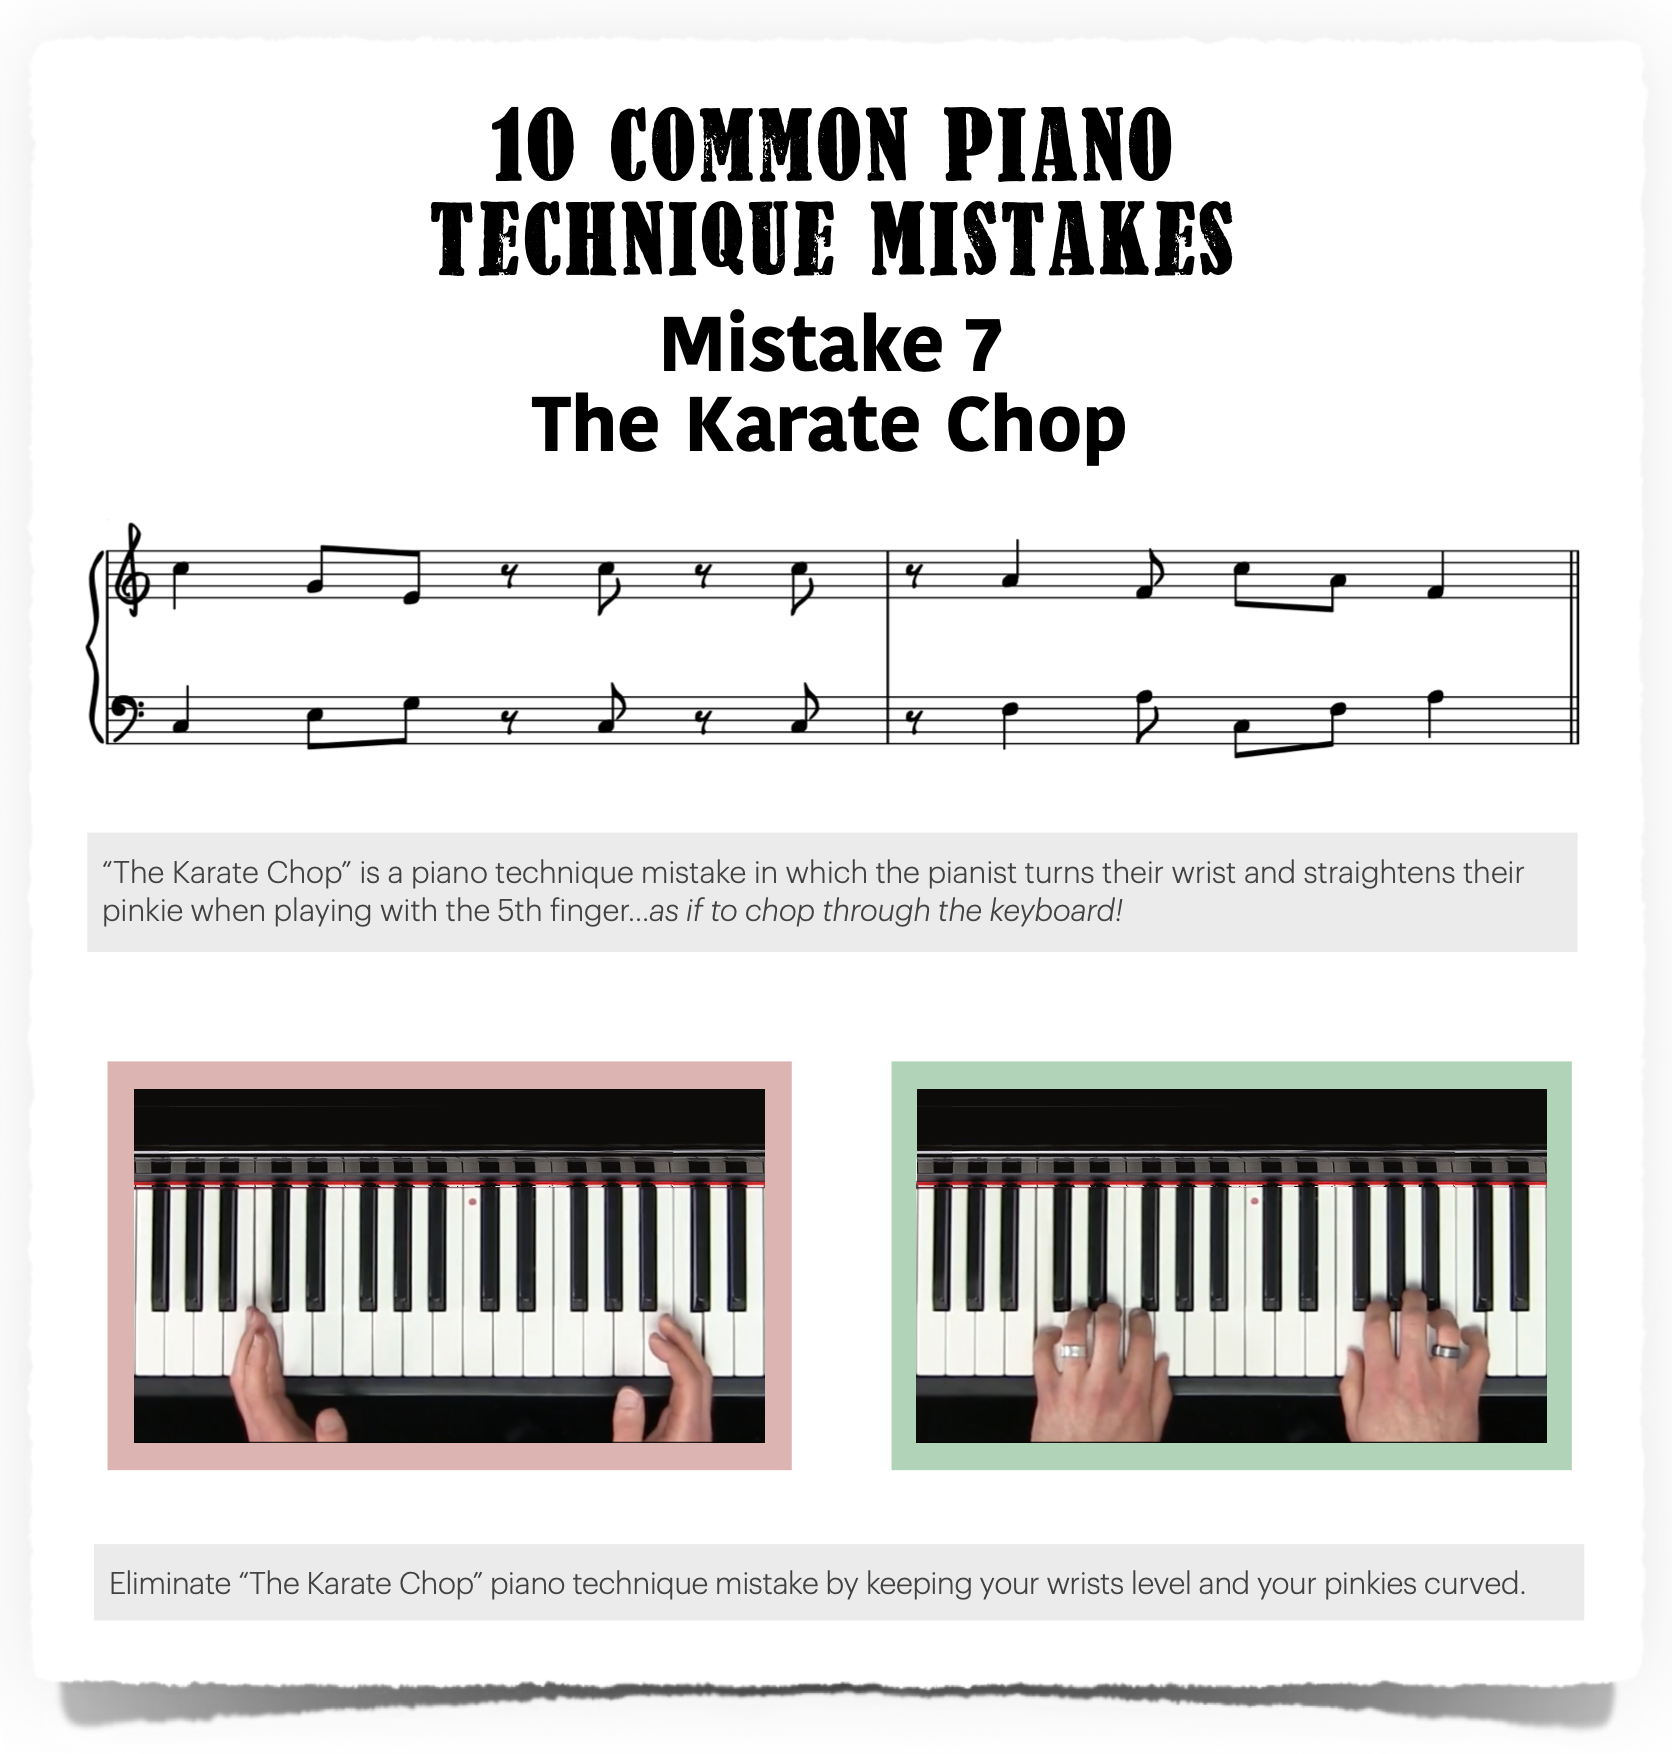
#7: The Karate Chop
“The Karate Chop” is another one of the most common piano technique mistakes, even among experienced players. This poor piano habit involves rotating the forearms and straightening the pinkie when playing with the 5th finger, as if to chop the piano in half! Try playing the following example: Do you tend to make a “chopping motion” when playing the C’s in this excerpt.

The Fix: Keep Wrists Level & Pinkie Curved
The fix for “The Karate Chop” is to keep your wrists level to the floor and your pinkies curved.
#8: The Hiccup
“The Hiccup” describes a poor piano playing habit in which a student plays with flat fingers. This technique results an audible “hiccup” when the thumb crosses under the other fingers, as in the following example.
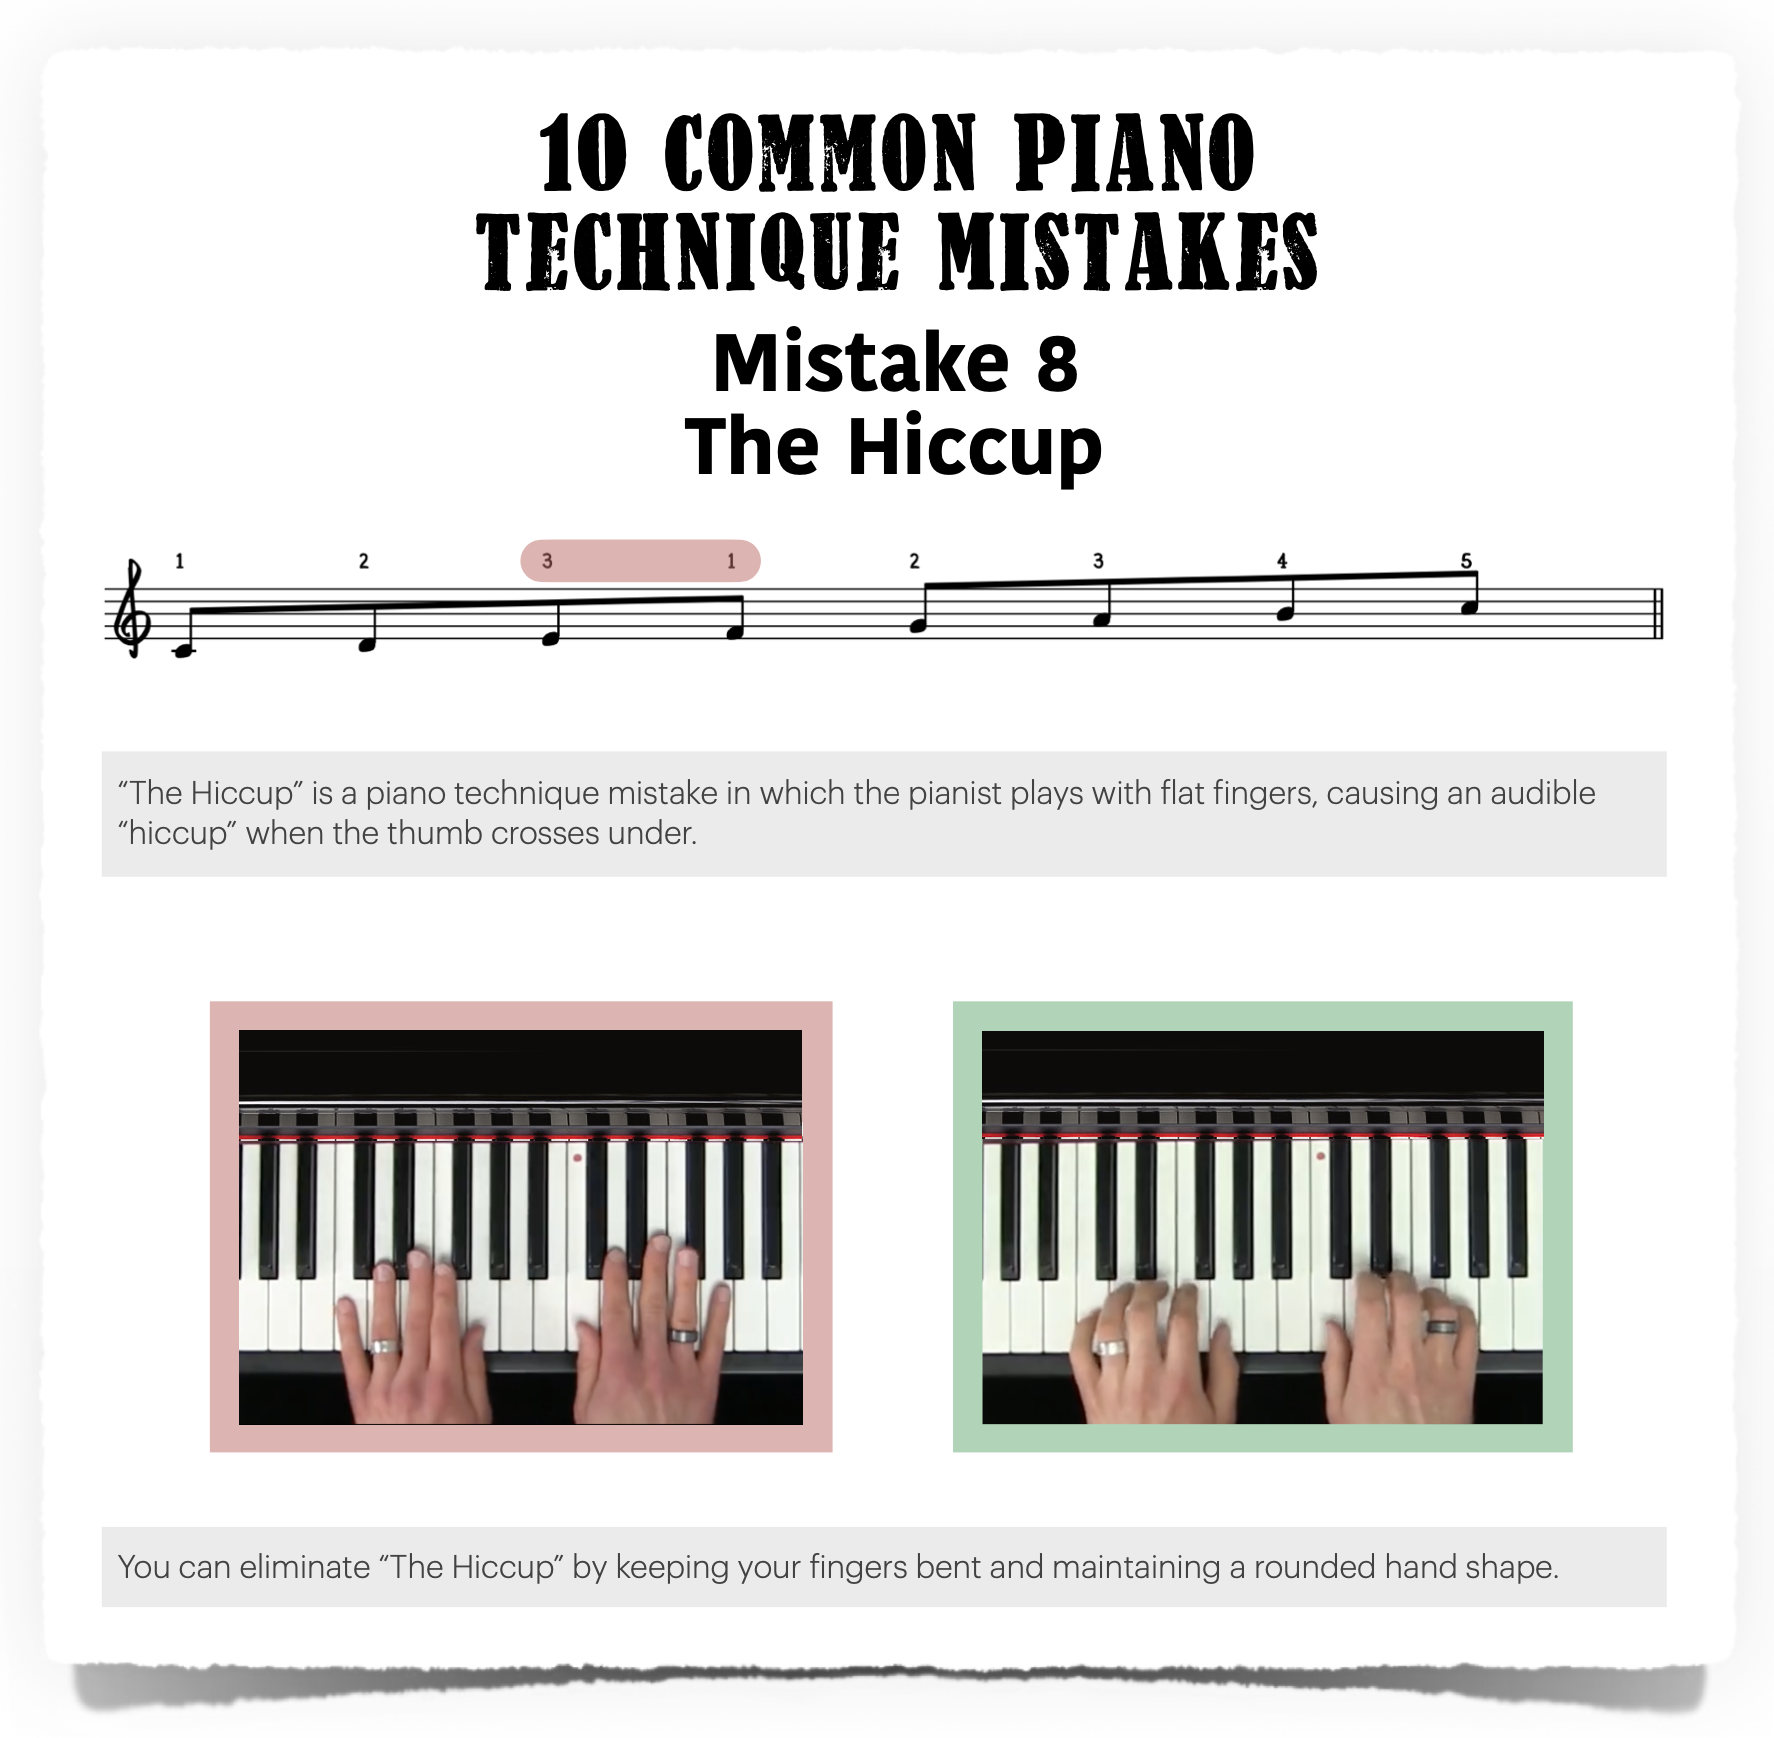
The Fix: Keep Fingers Bent and a Rounded Hand Shape
To avoid this undesirable hiccup, be sure to keep your fingers bent and maintain a rounded hand shape.

#9: The Kink
The next common piano technique mistake is equipment-related. When a piano student is not seated at the proper playing height, he or she will almost certainly succumb to “The Kink!”

As you can see in the pictures, “The Kink” is an unnatural bend in the wrists that comes from sitting either too low or too high. “The Kink” also commonly occurs when an electric keyboard is placed on a keyboard stand that is adjusted too high.
The Fix: Sit Level With the Keyboard
In order to make sure that “The Kink” doesn’t get the best of your playing, adjust your seat so that your elbows are bent at about 90 degrees as you extend your hands to the instrument. This will keep your forearms level with the instrument.

#10: The Wings
The final piano technique mistake in today’s lesson is “The Wings.” This describes a pianist who plays with their elbows sticking out from their sides, creating a wing shape.
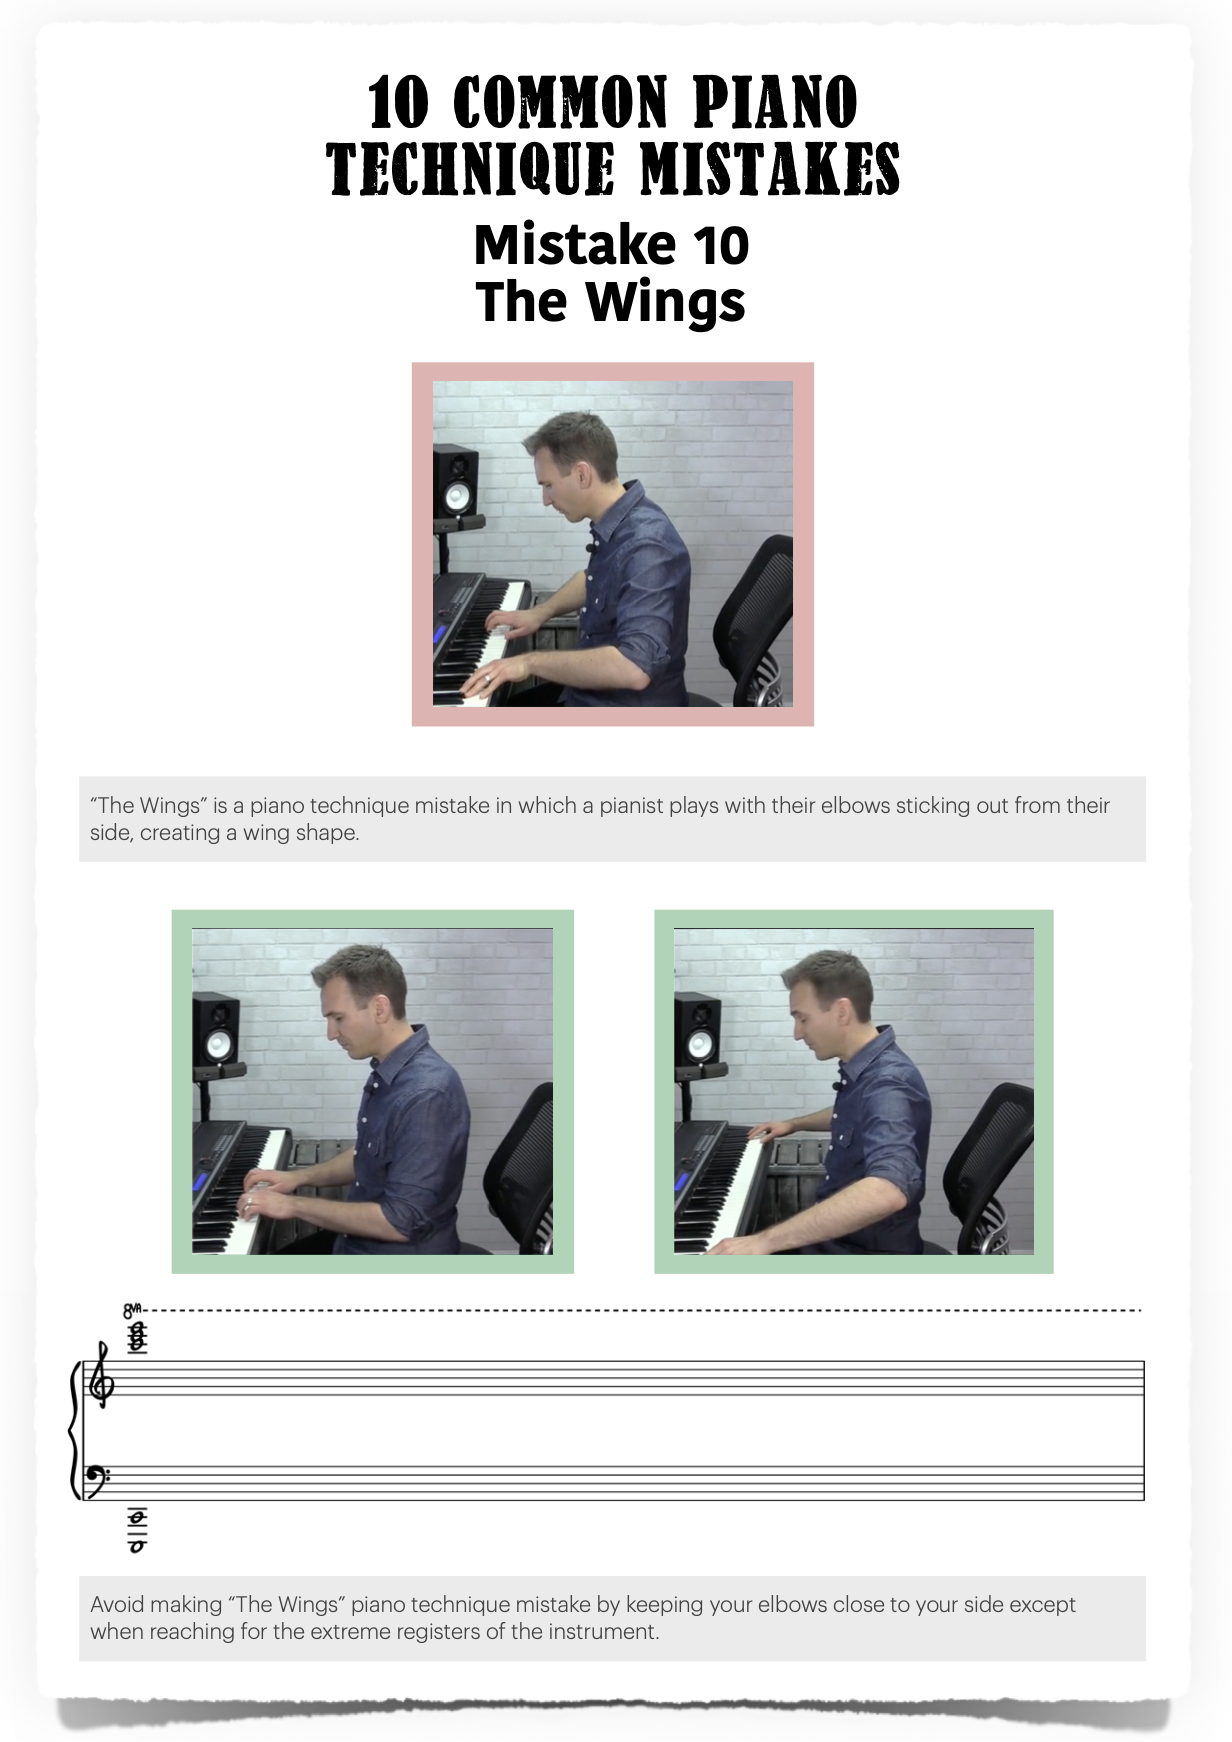
The Fix: Keep Elbows to Your Sides
To avoid “The Wings,” be sure to keep your elbows comfortably at your side while playing. An exception to this rule occurs when you must reach to the extreme upper or lower register of the piano. In that case, it is necessary to extend the elbows away from the body.

Additional Technique Resources
Congratulations, you’ve completed today’s lesson on 10 Common Piano Technique Mistakes. If you want to take a deep dive on additional technical studies, check out the following resources:
Piano Learning Tracks
Also, be sure to check out our Learning Tracks. Each track is personally curated by Jonny and Yannick to help you develop piano skills appropriate toward a particular playing level or musical style. Here are few of our most popular piano paths:
Thanks for learning with us today! We’ll see you next time.
Would you like to comment on this lesson?
Visit this Quick Tip on YouTube
¹ Newman, William S. The Pianist’s Problems: A Modern Approach to Efficient Practice and Musicianly Performance. New York: Da Capo Press, 1986, p. 44.
 Writer
Michael LaDisa
Michael LaDisa graduated from the University of North Texas with a major in Music Theory & Composition. He lives in Chicago where he operates a private teaching studio and performs regularly as a solo pianist. His educational work with students has been featured on WGN-TV Evening News, Fox 32 Good Day,...
More Free Lessons
In this lesson, I'm breaking down exactly which scales work best over major chords and minor chords—and the best part is that I'll give you options based on your playing level.
In this lesson, I'll break down the same jazz tune at three different levels and show you exactly what separates a beginner, intermediate, and advanced jazz player.
Today’s lesson is a very serious and scientific exploration into what your favorite chord says about your personality.
Looking for downloads?
Subscribe to a membership plan for full access to this Quick Tip's sheet music and backing tracks!
Join Us
Get instant access to this Quick Tip and other member features with a PWJ membership!
Guided Learning Tracks
View guided learning tracks for all music styles and skill levels
Progress Tracking
Complete lessons and courses as you track your learning progress
Downloadable Resources
Download Sheet Music and Backing Tracks
Community Forums
Engage with other PWJ members in our member-only community forums
Become a better piano player today. Try us out completely free for 14 days!
