5 Essential Piano Exercises
Learning Focus
Music Style
Free Lessons
Get free weekly lessons, practice tips, and downloadable resources to your inbox!
Would you like to improve your speed and control at the piano? Acquiring a strong piano technique is a little like buying a house. It’s a valuable asset that you invest in with routine payments over many years until finally…it’s yours! The main difference is the currency. You invest in your piano technique with time. Therefore, you need a plan. In today’s Quick Tip, you’ll learn 5 essential piano exercises that you can add to your practice routine to gain:
- Speed
- Strength
- Finger Independence
- Hand Coordination
- Control
These piano exercises only require you to read 5 notes, which makes them perfect for beginners! However, we’ve included tips for experienced players as well. In addition, we’ve also included an important section on how not to use these piano exercises.
Let’s get started.
C Major Position
The piano exercises in today’s lesson are played from the fixed hand position shown below. This is called this “C Major Position” or “C Position” for short. (The red dot indicates “middle C”).
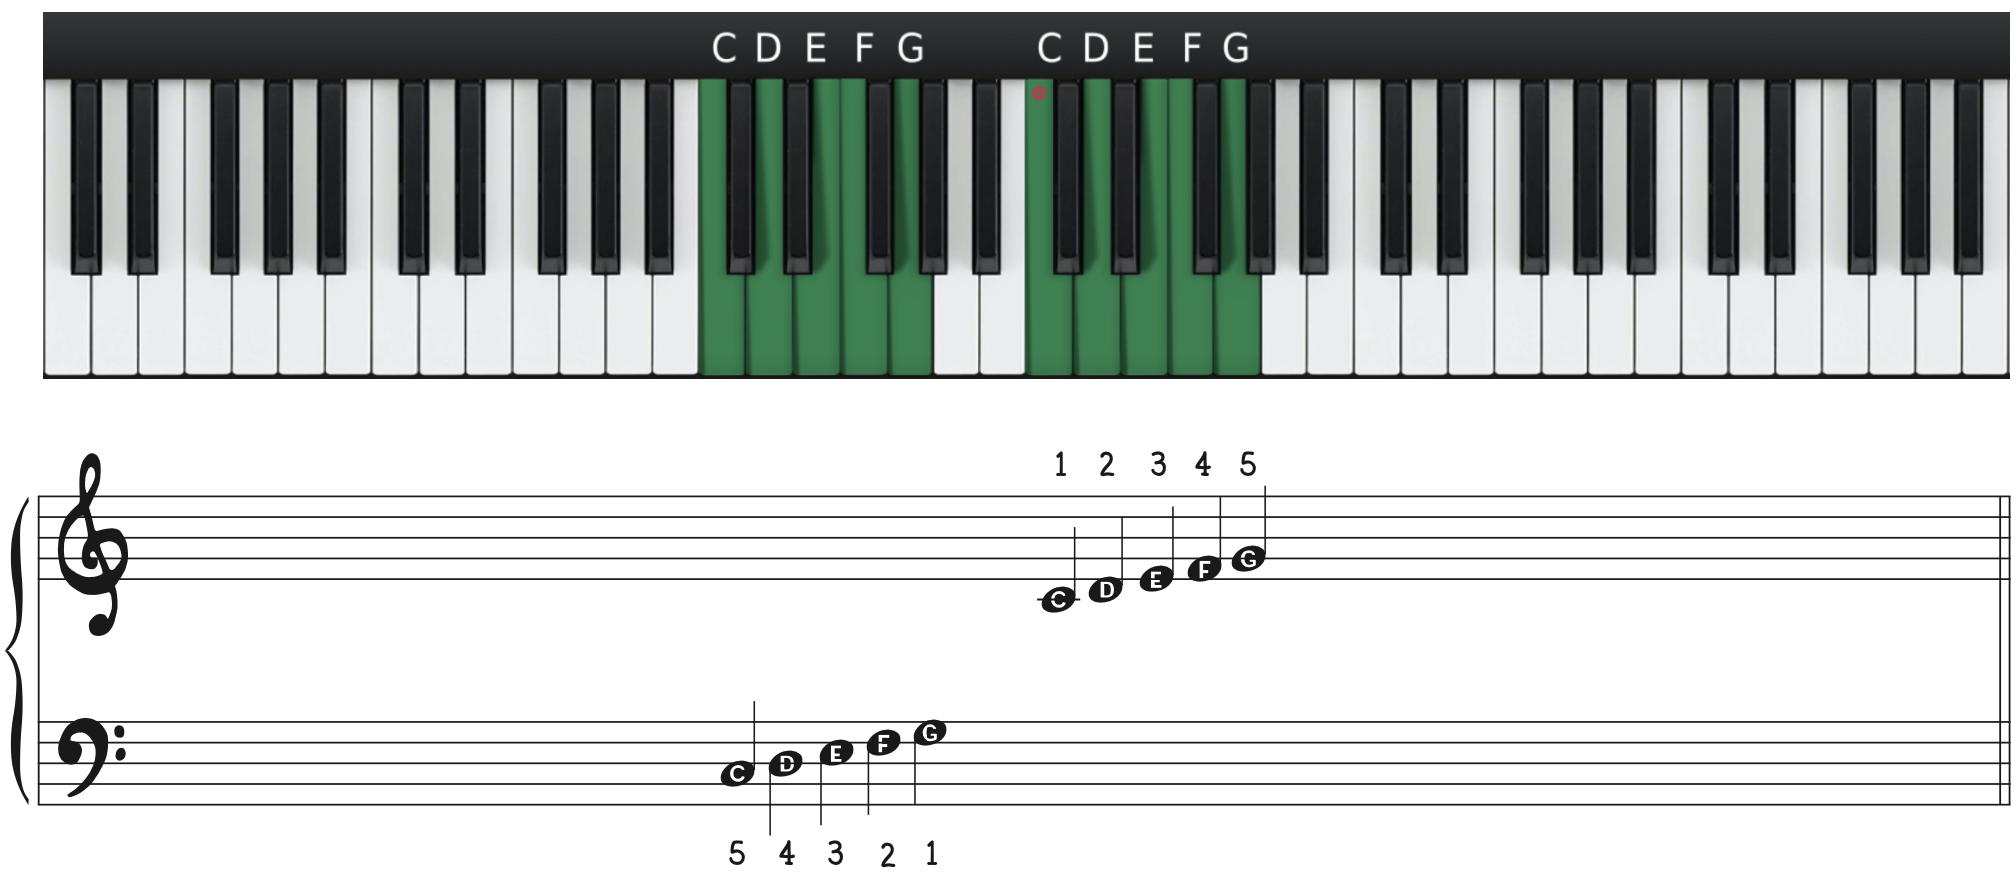
If you are new to reading notation, consider printing a copy of the diagram above to keep on your music stand. This is much better than writing in the note names on your scores or placing decals on your keyboard. You may also want to review Jonny’s Introduction to the Keyboard course for a complete overview of the basics.
The 5 Essential Piano Exercises in C Position
The first exercise is “The Neighbor Exercise.” In music theory, a neighbor note is a melodic ornament that occurs on a weak beat by stepping away from a chord tone a then returning back again. For example, in measure 1 in the right hand, the first D is a neighbor note to C. Since the direction of the step is upward, we can identify this more precisely as an upper neighbor. By contrast, the F in the bass clef in measure 1 is a lower neighbor to the G. You can click on the play button below the caption to hear a performance of each exercise.
Piano Exercise 1: Neighbors

As you begin to practice each of these piano exercises, be sure to acknowledge any cues your body sends you. For example, is there any tension in your hands, forearms or shoulders? If so, pause to release the tension. Then, from a relaxed state, begin the exercise again and focus on remaining relaxed. If you have difficulty remaining relaxed, your initial tempo is too fast.
In addition to your body mechanics, there are some important musical concepts to keep in mind. First things first, playing exercises like these are a great way to develop your sense of time. Playing along with one of the backing tracks will ensure that your timing is solid. In fact, you can download the backing tracks from the bottom of this page after logging in with your membership. You can also easily change the key of the entire lesson with our Smart Sheet Music.
Be sure to also listen to the sounds you are making as you play. Are your hands playing together? How is the balance between your hands? Are you able to play each note at the same volume? Try to avoid any unintended accents.
Great job! Now let’s check out exercise #2.
Piano Exercise 2: Pivot

“The Pivot Exercise” arranges gradually expanding intervals by “pivoting” from the thumb. In other words, you will play a 2nd, then a 3rd, then a 4th and finally a 5th.
If you are a more experienced player, you may want to increase the challenge of this exercise. Try pivoting off the pinky instead.
Ready for more? Let’s check out exercise #3
Piano Exercise 3: Trio

The “Trio Exercise” features melodic figures arranged in groupings of three notes. It begins with the thumbs and moves from the inner fingers to the outer fingers.
Want to increase the challenge a bit? Try reversing the order of the measures. As a result, you will begin the exercise with the weaker 4th and 5th fingers. Pay close attention to the the timing of the first two beats. Are you able to precisely subdivide 8th notes with your 4th and 5th fingers from the start?
Technical piano exercises like these work best when included in your daily practice routine for a period of time. Therefore, you’ll likely want several options to vary the intensity or perhaps just to keep them interesting. Why not try playing them in C minor instead? You can do this by replacing an E♭ for each E ♮. You can also transpose them to other major and minor keys.
Another option for varying these piano exercises is to position the hands four or more octaves apart. This will prohibit you from being able to look at both hands at the same time. As a result, you’ll develop a stronger tactile connection with the instrument. This will increase your spacial awareness across the keyboard.
Let’s continue on to exercise #4.
Piano Exercise 4: Skipper

Our fourth piano exercise, “The Skipper,” makes use of skips. The term “skip” refers to the interval of a 3rd. Depending on the context, a skip can be a major 3rd (C to E) or a minor 3rd (D to F). The universal principle is that a skip always bypasses 1 and only 1 letter name (ie: C–> skip D –>E). By contrast, intervals larger than a 3rd are referred to as leaps.
In the example above, note that The Skipper begins with the thumbs and works outward toward the pinkies. If you want a further challenge, try working inward by beginning on the outside with the pinkies.
Let’s continue to our 5th and final piano exercise.
Piano Exercise 5: Film Score

This exercise is fun to play and is reminiscent of film music, hence the name “The Film Score Exercise.” For ease of reading, this exercise has been notated just like the others in standard C Major Position. However, the demo is recorded with both hands an octave higher and uses a touch of pedal. This brings out the film-like character.
If you enjoy playing The Film Score Exercise, then you will love our full-length course on Endless Epic Chords (Level 2, Level 3). This course features luscious-sounding technical exercises over chord progressions found in modern film. This course draws on the popular styles of composers such as John Williams, Hans Zimmer and Danny Elfman.
Our next section contains a summary of all the exercise variations mentioned above as well as some further possibilities.
Variations on the 5 Essential Piano Exercises in C Position
Now that you have a thorough grip of each of the 5 Essential Piano Exercises in C Position, let’s discuss some finer nuances. If you’ve been playing for awhile, you have likely grown beyond repertoire in C Position. Consequently, you might tend to view these exercises as remedial. While these exercises are designed to be accessible to beginners, they are also rich with opportunities for advanced players. For example, try planing “The Neighbors Exercise” with extreme dynamic variations such as beginning with fortissimo (ff) and then dropping to pianissimo (pp) on the repeat. Many players find it difficult to play softer without slowing down. You can also try more gradual dynamic changes such as crescendos and diminuendos of various lengths. Another great study for hand independence to play each hand at a different dynamic level (ie: RH mf, LH p).
Another category of variation for intermediate and advanced pianists is to explore is different articulations. For example, try playing each exercise staccato (an Italian term meaning “detached” and generally regarded as “short”). You could also try playing with slurs of varying lengths. For example, you could slur the first two notes of each 4-note group and play the 2nd two notes short.
You can also explore these piano exercises further by playing them in parallel motion. Parallel motion means that each melodic line moves in the same direction by the same interval. In the context of today’s lesson, that would mean reading just one clef at a time and playing the exercise in both hands an octave apart. This presents its own set of challenges because now, unlike in contrary motion, your hands are no longer mirror images of one another. Here is an example of “The Neighbor Exercise” in parallel octaves:
Summary of Playing Considerations
Here is a quick summary of possible adaptations discussed throughout this lesson:
-
- Tempo (aka “speed”)
- Tonality (Major vs Minor)
- Transposition (different keys)
- Register (different octaves)
- Contrary vs. Parallel Motion
In addition to the above compositional adaptations, here is a summary of musical considerations to keep in mind:
-
- Metric accuracy
- Hand balance
- Dynamics
- Articulation
As you can see, the uses for these piano exercises are endless. However, there is also a way not to use them!
How Not to Use Piano Exercises
Before we conclude, a word of caution is needed. You probably know that a bank wouldn’t give you a home mortgage loan that requires the majority of your monthly income. In the same way, you don’t want to spend the majority of your practice time on technical drills. Even though you can start practicing these exercises today, you shouldn’t necessarily practice them all today! In his book, The Pianist’s Problems, author William S. Newman laments, “we tend to regard technique as an end in itself instead of a means to musical ends,” (68). Simply put, you won’t get many requests on a gig for Hanon, Czerny or Pischna.
So how much time should you spend on technical studies? Most piano educators recommend spending no more than 15% of your practice time on technique. You might be able to increase your initial speed on these exercises by as much as 25 BMP in an hour. However, you are better served by gaining 50 BMP over the course of a month with just 10 minutes a day. As a result, you’ll have much better clarity and control in your playing. You’ll also have time to expand your piano repertoire!
If you enjoy repertoire based on patterns like these, then you’ll love the following resources:
- “Believe” (Level 3)
- Film Improvisation (Level 3)
- “Cascade” (Level 2)
- Pop & Contemporary Piano Accompaniment: Popstinatos (Levels 2 & 3)
- “Angels We Have Heard On High” (Level 2)
Thanks for learning with us today. We’ll see you next time!
Would you like to comment on this lesson?
Visit this Quick Tip on YouTube
 Writer
Michael LaDisa
Michael LaDisa graduated from the University of North Texas with a major in Music Theory & Composition. He lives in Chicago where he operates a private teaching studio and performs regularly as a solo pianist. His educational work with students has been featured on WGN-TV Evening News, Fox 32 Good Day,...
More Free Lessons

In this lesson, I'm breaking down 5 of Ray Charles’ signature blues licks that you can start using right away.
In this lesson, I'm taking the exact same scale and showing how three simple ideas can make it sound completely different.
In this lesson, I’ll show you three techniques that show up again and again in Billy’s playing—and you can start using them in your own music right away.
Looking for downloads?
Subscribe to a membership plan for full access to this Quick Tip's sheet music and backing tracks!
Join Us
Get instant access to this Quick Tip and other member features with a PWJ membership!
Guided Learning Tracks
View guided learning tracks for all music styles and skill levels
Progress Tracking
Complete lessons and courses as you track your learning progress
Downloadable Resources
Download Sheet Music and Backing Tracks
Community Forums
Engage with other PWJ members in our member-only community forums
Become a better piano player today. Try us out completely free for 14 days!
