Improvise Beautiful Piano with the Hope Chord
Learning Focus
Music Style
Free Lessons
Get free weekly lessons, practice tips, and downloadable resources to your inbox!
Do you want to to improvise beautiful piano music? You can, even if you’re a beginner. It actually doesn’t require method books, music theory, or even formal training. Instead, the two key ingredients for developing improvisation skills are immersion and imitation. In this lesson, you’ll learn to reproduce beautiful contemporary piano melodies using a simple framework called the hope chord. In fact, the simple shape of the hope chord is actually sort of a “chameleon voicing” because it works over several different chord symbols. This makes it the perfect accompaniment for beginners to use while expanding their right hand improv technique. But don’t let that fool you—the hope chord gives a truly professional piano sound that is used in pop and contemporary worship settings all the time! Here’s what you’ll learn in today’s Quick Tip:
- 1 Left Hand Chord Shape that is 3-Chords-in-One
- 2 Contemporary Piano Accompaniments
- 2 Right Hand Grips
- 3 Piano Improv Techniques
If you’ve always wanted to improvise at the piano, this lesson is for you!
Let’s dive in!
Intro to The Hope Chord
So what exactly is this chameleon chord? Well, you won’t find it in your piano method books. That’s because the hope chord it isn’t a triad. Rather, it’s a versatile contemporary piano voicing found in compositions by artists such as Yurima and Brian Crain. It contains a whole tone cluster making it a bit more advanced in terms of its harmonic construction. However, it’s very simple to play.

One way to understand and remember this voicing is as a slash chord. In the example above, the chord symbol F/G signifies that the upper three notes form an F major triad above a bass note of G. This slash chord symbol is simply another way of expressing the chord G9(sus4), which is one way in which we’ll use this voicing in today’s lesson.
Now, if these explanations are too complicated, don’t let that stop you from continuing on in this lesson. You will absolutely be able to use these tools to improvise, even if the theory is beyond your current proficiency.
3 Chords in One
There are several benefits to learning the hope chord. First, as you’ll see in this section, you can actually use this voicing for several different chords. Secondly, its unique harmonic character will add depth of color to your piano sound.
Let’s begin by playing the example below. This example demonstrates how the hope chord works as 3 different chords depending on which note is in the bass.

You can probably hear already how these chords have a pleasant sonic property that is commonly found in pop music. In the next section, we’ll apply these chords to an accompaniment pattern.
Accompaniment Groove with the Hope Chord
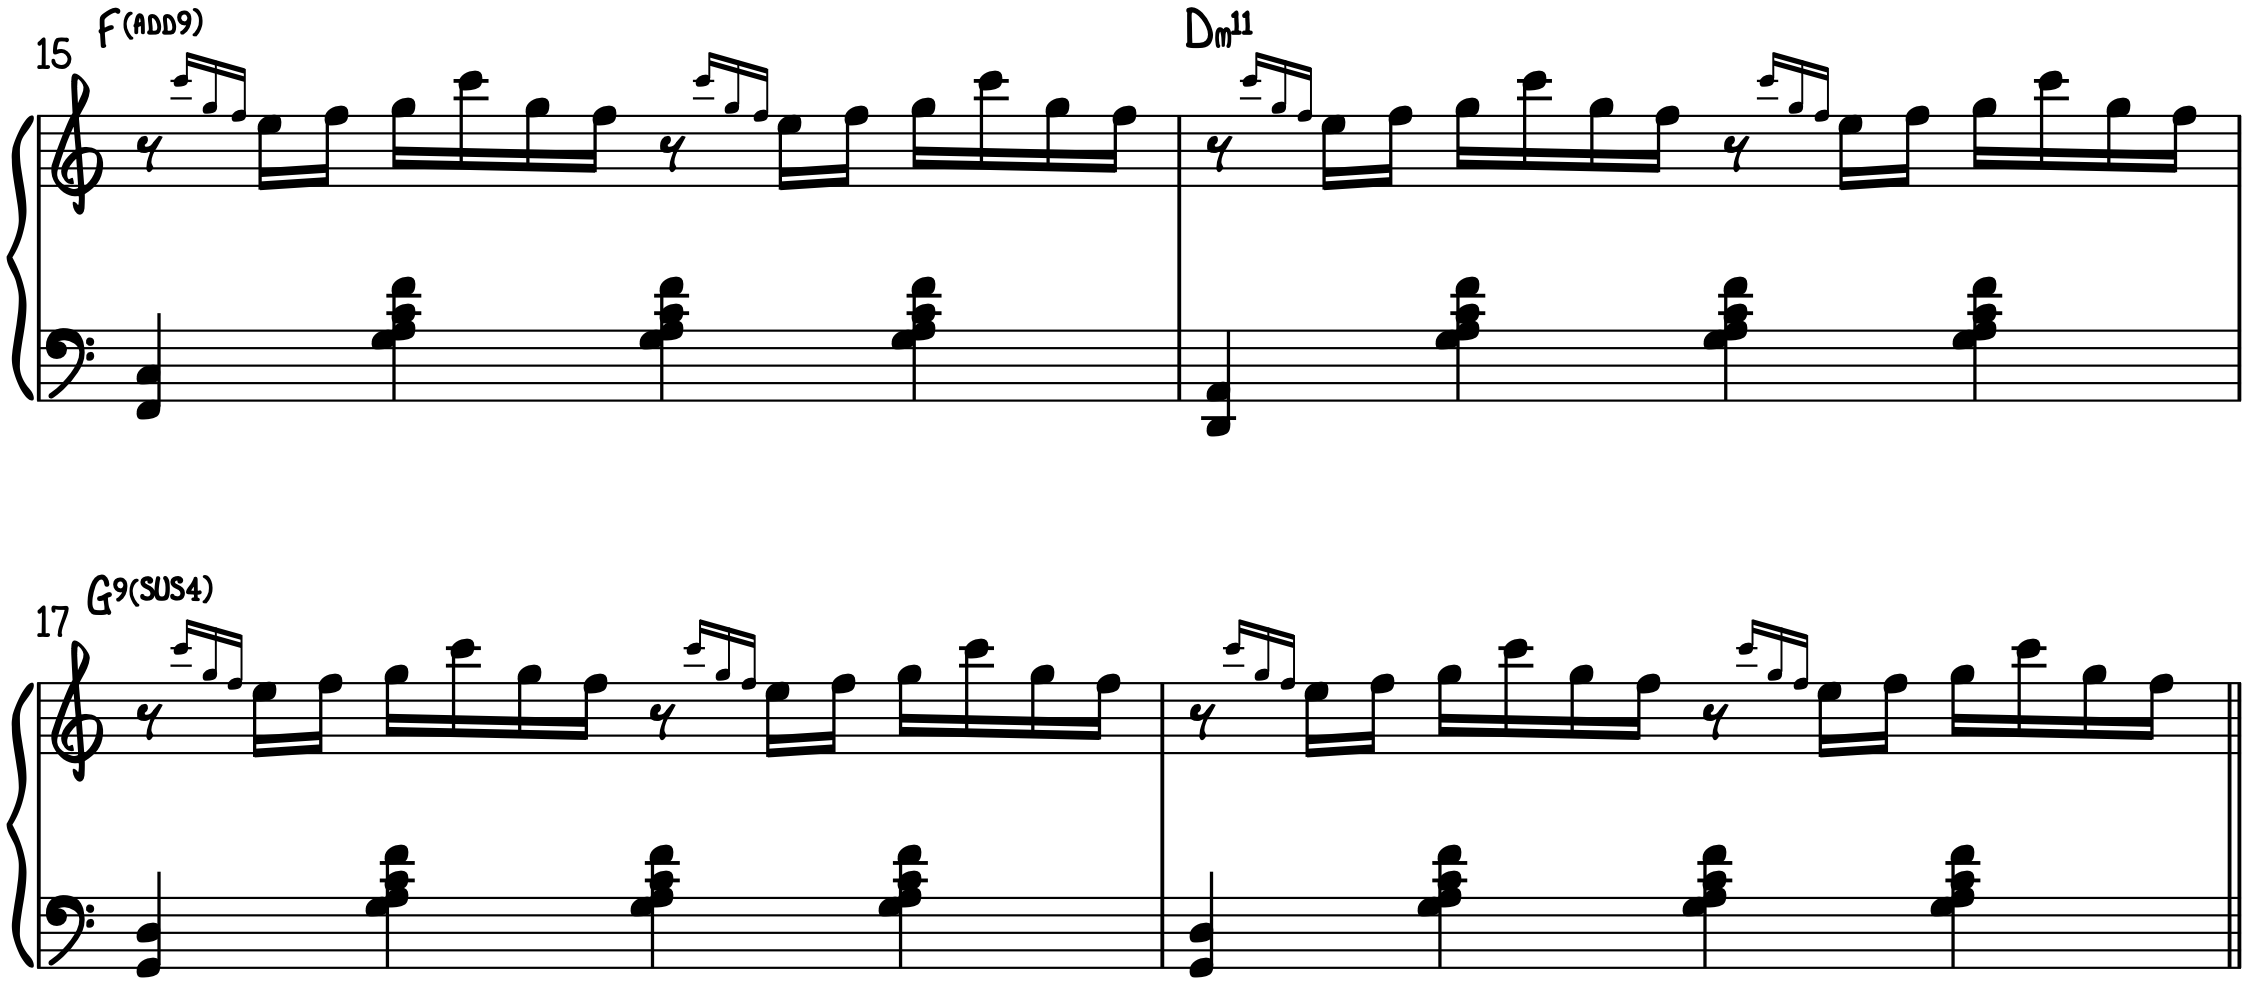
The great thing about accompanying yourself with the hope chord is that it is effortless. The accompaniment groove for this lesson cycles through the chords F(add2), Dm11 and G9(sus4). You can literally play the same chord shape for each chord! In fact, if you are playing with an ensemble (or the included backing track) you don’t need to move your left hand at all! The bass player will provide the low end movement needed to change chords. However, if you are playing in a solo piano context, you can simply play an open 5th on beat 1 of each measure. Then play quarter notes with the hope chord for each of the remaining beats. The example below demonstrates a hope chord accompaniment groove specifically for solo piano settings. However, this version also works in with an ensemble.

Next, let’s play this groove with the backing track that is included with this lesson. You can download the backing track and lesson sheet from the bottom of this page after logging in with your membership. You can also easily transpose this lesson to any key with a single click using our Smart Sheet Music.
Now you are ready to explore some right hand improv techniques in the next section!
2 Right Hand Grips
A great way to begin to improvise as a beginner is to use a restrictive practice technique called grips. Grips are simply a set of notes played from a fixed hand position. If you are a beginner, you probably learned hand positions like C Major Position or Middle C Position. In a sense, those hand positions are also grips! However, the grips that are used for improvisation generally contain a mixture of different intervals that usually include steps and leaps. This creates more interesting melodic lines. The image below shows the two grips we’ll be using for this lesson. Both grips contain the same collection of notes. However, each grip arranges the notes in a different range and hand shape.

Before moving on to the next section, spend some time getting comfortable with each grip shape. For example, play the notes for each grip at the same time to get familiar with the hand shape. For the lower grip, the fingering 1-2-4-5 will be your best option. The upper grip position works best with a fingering of 1-2-3-5. Next, play each grip in various registers up and down the keyboard. The more quickly you can access each grip, the more freely you will be able to improvise.
In the next section we’ll combine these grips with our accompaniment pattern.
3 Improv Techniques with the Hope Chord
Remember earlier we mentioned that improvisation is developed through immersion and imitation? Sometimes students skip these steps in their eagerness to start improvising. As a result, their improv usually lacks proper musical syntax. The following exercises provide the necessary context (immersion) and melodic materials (imitation) to help your lines sound beautiful and natural.
16th Notes
The first exercise uses the upper grip position in a 16th note pattern. At first glance, all those 16th notes in the example below can look pretty scary. However, our tempo is 60 BPM . Therefore, these 16th notes aren’t moving so fast after all.

Ah, isn’t that beautiful? At this slower tempo, you’ll primarily be relying on 16th note rhythms to propel your lines. Before moving on, try applying the same melodic pattern above in the lower grip position.
Brushes
Another beautiful technique you’ll want to master is a melodic gesture called the brush technique. Brushes are fast but delicate melodic ornaments that will give a touch of elegance to your lines. The example below uses brushes in the upper grip position.

Great job! Be sure to practice your brushes with the included backing track to ensure you are playing with a consistent tempo. This technique also works in the lower grip position.
Harmonies
A final technique to explore is harmonized lines. Harmonies combine notes of a grip by repeating the top note over a melody played with the lower notes.

Excellent! Hopefully you are beginning to see how restricting yourself to grip positions actually expands rather than limits your potential. Of course, as you gain proficiency, you can explore beyond these grips.
Congratulations! You have come to the end of today’s lesson. If you enjoyed this lesson, you’ll also love the following courses from our library:
- Contemporary Progressions and Improv 1 (Level 2)
- Contemporary Progressions and Improv 2 (Level 3)
- Pop & Contemporary Piano Accompaniment: The One Chord Wonder
- The Love Progression Challenge (Levels 2 & 3)
- Pop & Contemporary Piano Accompaniment: Popstinatos (Levels 2 & 3)
- Go the Distance from Hercules 1 (Level 2)
- Go the Distance from Hercules 2 (Level 3)
Thanks for learning with us. We’ll see next time!
Blog written by Michael LaDisa / Quick Tip by Jonny May
More Free Lessons
Struggling to play blues piano with skill and sensitivity? Master these blues piano left hand patterns to take your feel to the next level!
Some jazz standards like “On Green Dolphin Street” mix Latin and swing within the same song…Learn how to master these “transition tunes.”
Learn to play in the exhilarating rock and roll piano style of Little Richard and Jerry Lee Lewis—including grooves, chords, licks and riffs.
Looking for downloads?
Subscribe to a membership plan for full access to this Quick Tip's sheet music and backing tracks!
Join Us
Get instant access to this Quick Tip and other member features with a PWJ membership!
Guided Learning Tracks
View guided learning tracks for all music styles and skill levels
Progress Tracking
Complete lessons and courses as you track your learning progress
Downloadable Resources
Download Sheet Music and Backing Tracks
Community Forums
Engage with other PWJ members in our member-only community forums
Become a better piano player today. Try us out completely free for 14 days!


