C Natural Minor Scale – The Complete Guide
Learning Focus
Music Style
Free Lessons
Get free weekly lessons, practice tips, and downloadable resources to your inbox!
As a music student, perhaps you know of the natural minor scale, but are not sure how to actually use it in your playing? The following complete guide on the C Natural Minor Scale addresses this common experience. In fact, a solid understanding of the natural minor scale can make major changes in your playing! In this lesson, you’ll discover:
- Intro to Natural Minor Scales
- How to Play the C Natural Minor Scale on Piano for All Levels
- C Natural Minor Diatonic Chords
- 2 Awesome Natural Minor Chord Progressions
- How to Improvise with the C Natural Minor Scale on Piano
- Appendix: 3 Ways to Construct Any Natural Minor Scale
After applying the techniques in this lesson, you’ll be amazed at just how easy it is to improvise beautiful piano music using a simple natural minor scale.
Intro to Natural Minor Scales
In many piano learning systems, minor scales are not a beginner topic—or at least not an early beginner topic. For example, most method books introduce minor scales either toward the end of book 1 or at the beginning of book 2. There are certainly valid reasons for this deliberate manner of sequencing. However, beginner piano students can also greatly benefit from early exposure to minor scales, chords and keys.
One compelling reason to introduce minor sounds early on for beginner students is that students have a tendency to fear what they don’t understand. Before long, students can buy into myths about minor sounds that become self-fulfilling! For example, in a previous blog on The Most Beautiful Minor Chord Progression on Piano, we discussed “3 Myths Students Believe About Minor Chord Progressions.” Here is a summary of the 3 myths:
- Myth 1: Minor Chords Are More Complicated
- Myth 2: Minor Chord Progressions Are More Difficult
- Myth 3: Minor Keys Are for Advanced Students
If you missed that blog, be sure to check it out using the link above so that you can debunk these myths for yourself.
Perhaps you are completely unfamiliar with minor sounds when it comes to music? If that describes you, keep reading—this blog is for you! But first, be sure to download today’s lesson sheet PDF and backing track. These resources appear at the bottom of this page after logging in with your membership. You can also easily transpose this lesson to any key with our Smart Sheet Music.
What is the Difference Between Major and Minor in Music?
The most practical way for the average listener to understand the difference between major and minor sounds is think of them as distinct sound colors. In fact, exposure to and comparison of different tonal colors is necessary in order for the brain to categorize them effectively.


If you are a beginner, try replicating the following 5-finger patterns in C major and C minor.
As you can hear, major is not minor. Similarly, minor is definitely not major. They are different, like green and blue. Recognizing them as different is a significant step in understanding what these labels mean. Just like regular colors have associations, sound colors have common associations too. For example, major sounds are often described as happy, bright or upbeat whereas minor sounds are considered sad, dark or melancholy.
If you’d like to learn how to describe these tonal differences in musical terms, check out our Quick Tip on Piano Chords—The Definitive Guide.
What is the C Natural Minor Scale?
The C Natural Minor Scale is a 7-note scale containing the notes C–D–E♭–F–G–A♭–B♭. Like all natural minor scales, C natural minor contains ½ steps between the 2nd and 3rd scale tones (D→E♭) and between the 5th and 6th scale tones (G→A♭). The relative key for C minor is E♭ major. This association means that both keys share a common key signature of 3 flats: B♭–E♭–A♭. Another name for the natural minor scale is the Aeolian mode.
C Natural Minor Scale
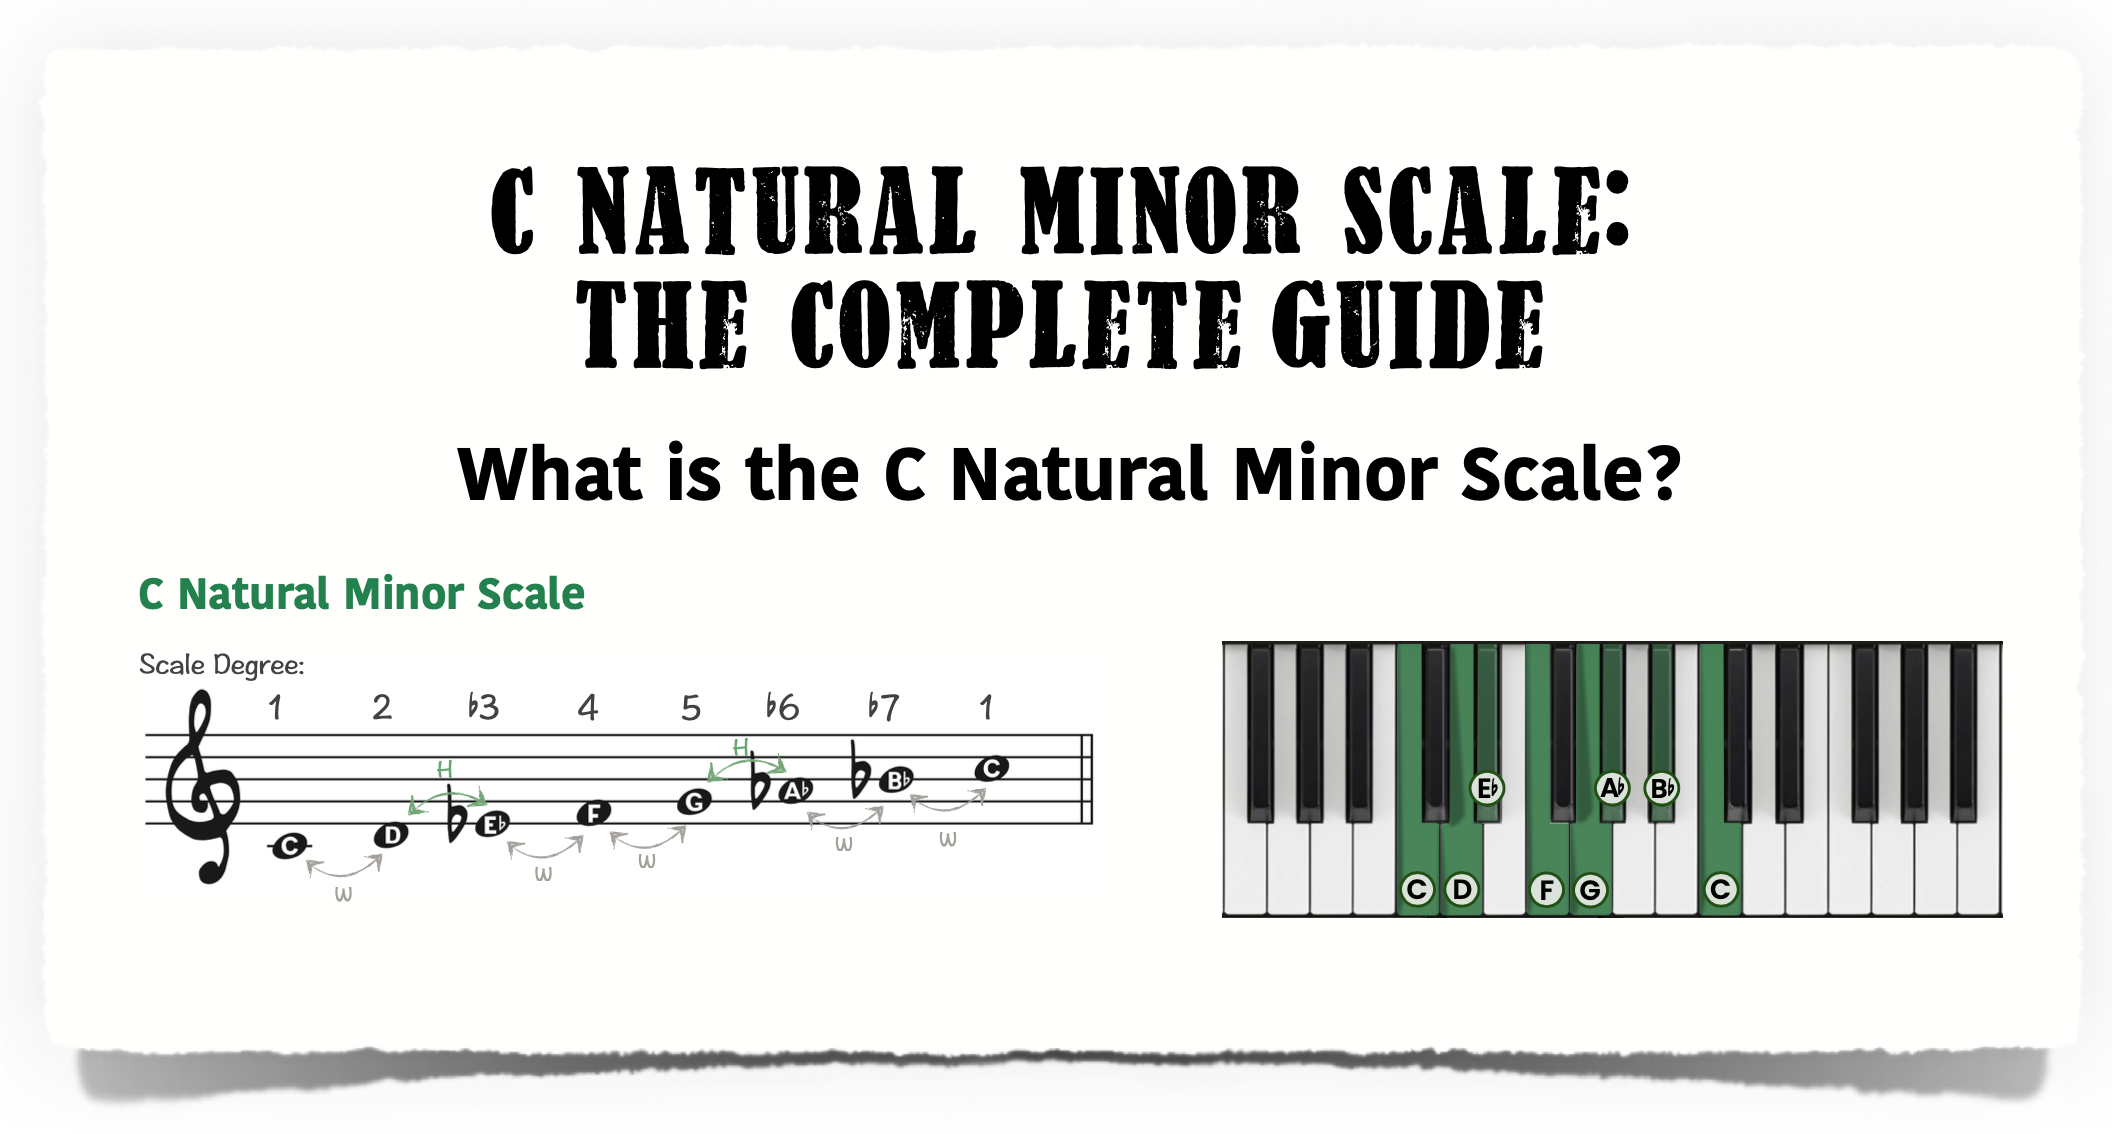
[Tap or click on the keyboard to hear the scale.👆🖱🎹🔊]
A distinctive characteristic of the natural minor scale is the whole step between the 7th tone and the tonic. This characteristic is not found in the major scale, nor does it occur in the harmonic minor and melodic minor variations. In fact, this lowered 7th tone has a specific name in music theory—it is the subtonic. By comparison, the term leading tone is reserved for the sound of the 7th scale degree only when it is specifically a ½ step below tonic, as in the major scale, as well as the harmonic and melodic minor scales.
The whole step between 7 and 8 fails to lead into the tonic with the same conviction as in major. For this reason, the term leading tone is not used to indicate the seventh degree of the minor scale in its natural form. We use the term subtonic instead.
—Harmony and Voice Leading, Edward Aldwell & Carl Schachter
In the appendix to this lesson, we explain and examine 3 ways to construct any natural minor scale.
How to Play the C Natural Minor Scale on Piano for All Levels
Depending on your playing level and experience, you may want to practice the C natural minor scale in 1 octave, 2 octaves or even 4 octaves. No matter what, we’ve got you covered in this section with notation examples containing all the correct notes and piano fingerings—even accompanying video demonstrations.
C Natural Minor Scale Fingering Groups
Even though major and minor scale fingerings are not universal for every key, there is a universal principle for how fingerings are organized. Therefore, before getting started playing any scale, it’s important to understand how the fingerings are grouped. For example, each 7-note major and minor scale contains two fingering groups—one that contains 3 fingers and another that contains 4 fingers. The table below shows the fingering groups for C natural minor.

It’s important to notice that these groups never contain the 5th finger. As a matter of fact, for many piano scales the 5th finger is not used at all! However, for C natural minor, we generally begin the scale with the 5th finger in the left hand and terminate the scale with the 5th finger in the right hand.
In the following notation examples, each fingering group of 3 is indicated with green numbers. In addition, the use of the 5th finger is displayed in grey to indicate that it is not included in either fingering group.
Beginner C Natural Minor Scale Fingering—1 Octave

Intermediate C Natural Minor Scale Fingering—2 Octaves
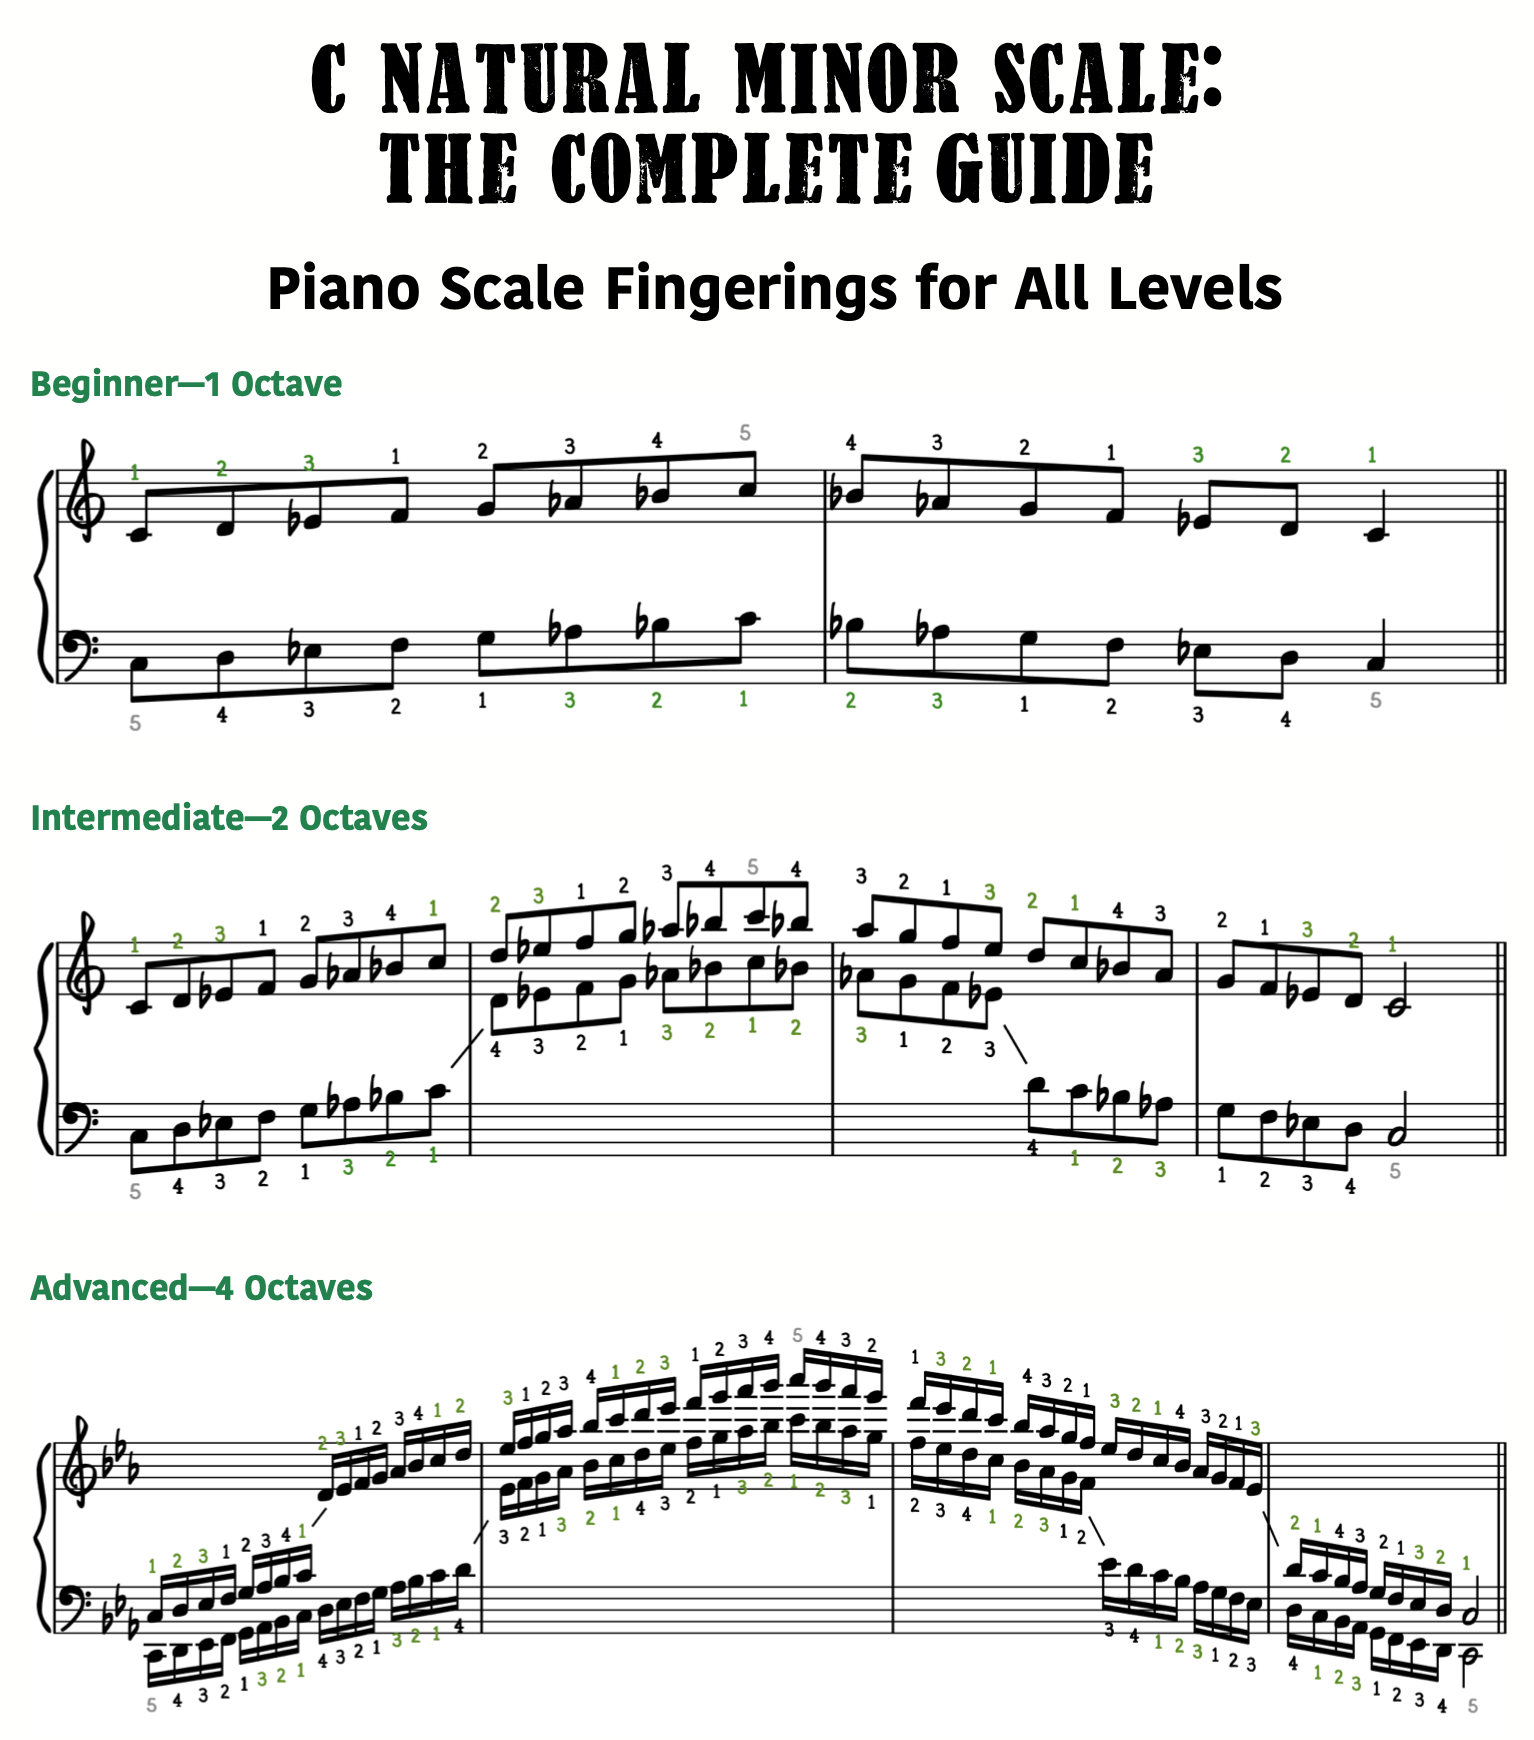
Advanced C Natural Minor Scale Fingering —4 Octaves

Great job playing the C natural minor scale in a manner that’s appropriate for your piano playing level! In the next section, you’ll learn all the chords that come from this scale.
C Natural Minor Diatonic Chords
Since the C natural minor scale has 7 tones, there are 7 diatonic triads that the scale can create: C minor, D diminished , E♭ major, F minor, G minor, A♭ major and B♭ major.
C Natural Minor Diatonic Triads

(Note: Diatonic chords are those chords that come from a particular scale. In fact, that’s what the word “diatonic” means in music. Therefore, we usually say “diatonic chords in major” or “diatonic chords in minor.”)
We can also build diatonic 7th chords from the C natural minor scale. These chords are: Cm7, Dø7, E♭maj7, Fm7, Gm7, A♭maj7 and B♭7.
C Natural Minor Diatonic 7th Chords

At this point, it’s important to note a significant different between major and minor tonality. While we only have 1 major scale, we actually have 3 types of minor scales—natural minor, harmonic minor and melodic minor. Furthermore, each of the minor scales produce a slightly different set of the diatonic chords. However, when composers use minor tonality in their music, they rarely draw use just one minor scale exclusively. Instead, they most often mix chords from any of the minor scale constructions. For the purpose of this lesson, however, each example is limited to the diatonic chords that come from C natural minor.
To learn more about harmonic minor and melodic minor scales, check out Jazz Piano Improv and the Melodic Minor Scale (Int/Adv).
To master all your 7th chords, check out the following courses:
- Major 7th Chord Exercises (Int)
- Dominant 7th Chord Exercises (Int)
- Minor 7th Chord Exercises (Int)
- Diminished and Half Dim 7th Chord Exercises (Int)
Are you ready to learn some awesome minor chord progressions?
2 Awesome Natural Minor Chord Progressions
If you want your data about natural minor scales to go beyond mere head knowledge, then you’ve come to the right place! In this section, you’ll learn to play two awesome chord progressions that come from the C natural minor scale.
The first progression, i →VI→III→VII, is extremely common in popular music and is known as the “Axis of Awesome Progression.” You may recall that earlier we pointed out that the natural minor scale does not contain a leading tone. In the absence of such ½ step voice-leading into the tonic note, this progression is often analyzed in the relative major key (shown below in grey). Either analysis is valid, but be careful—this topic will often start an argument among music theory nerds.
Progression 1: i →VI→III→VII

The second progression (i→iv→ii°→v), while not quite as pervasive, epitomizes the characteristically dark sound of the Aeolian mode, or natural minor.
Progression 2: i→iv→ii°→v

Sample Accompaniment Patterns
In today’s Quick Tip video, Jonny demonstrates two piano accompaniment patterns that sound great on these natural minor chord progressions. The examples below illustrate how to apply each pattern to progression 1.
Longing 9
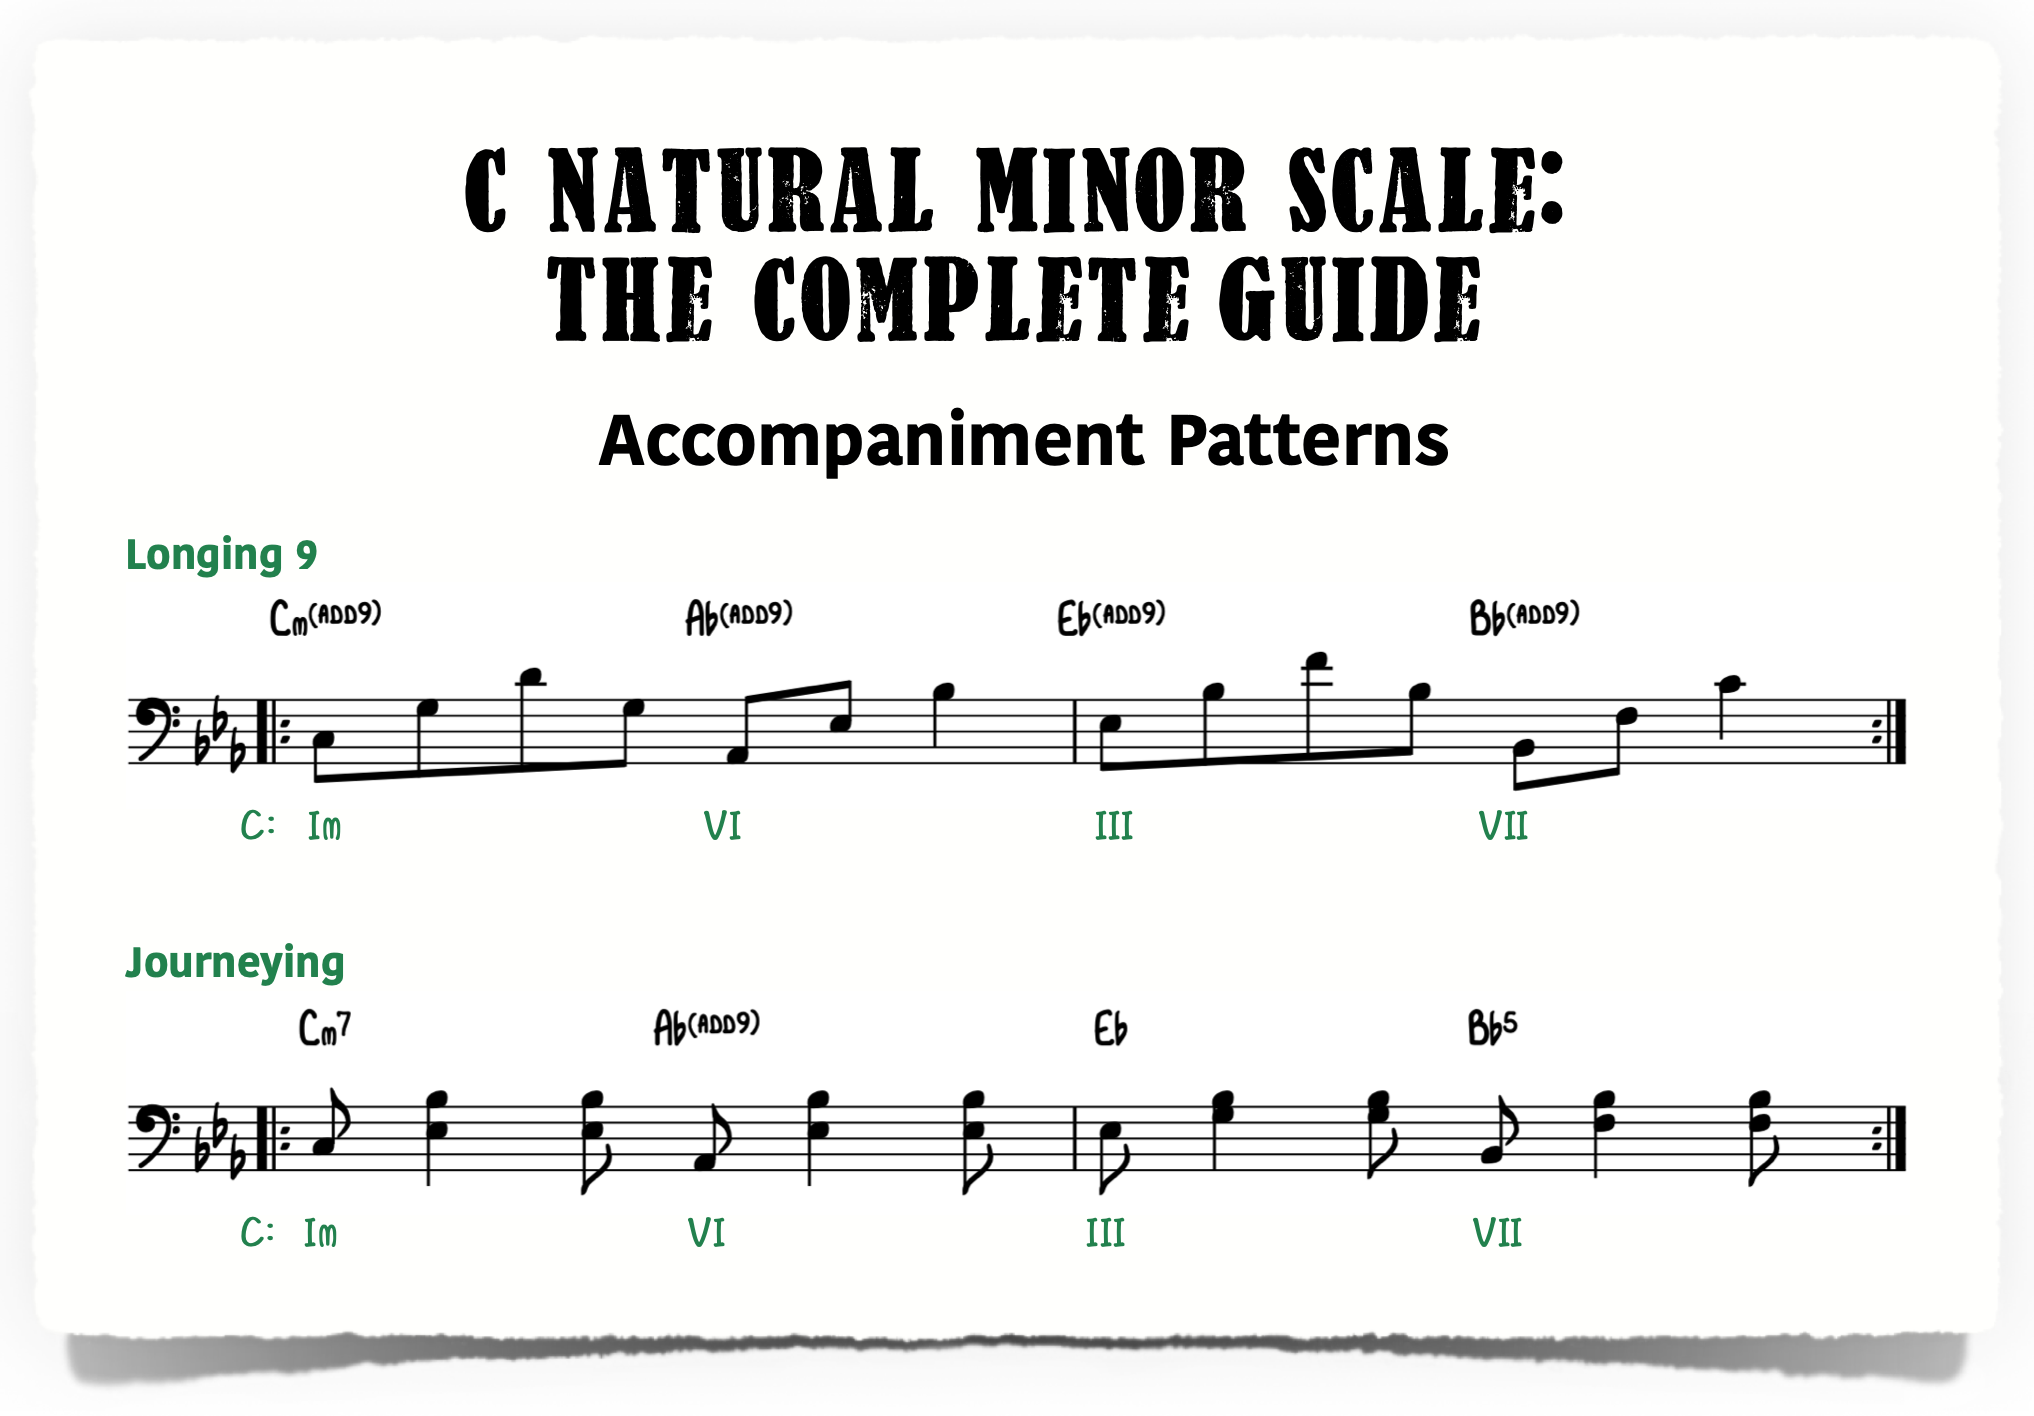
Journeying

Now that you’ve learned the C natural minor scale, diatonic chords, chord progression and accompaniment patterns, there’s only one thing left to do…improvise!
How to Improvise with the C Natural Minor Scale on Piano
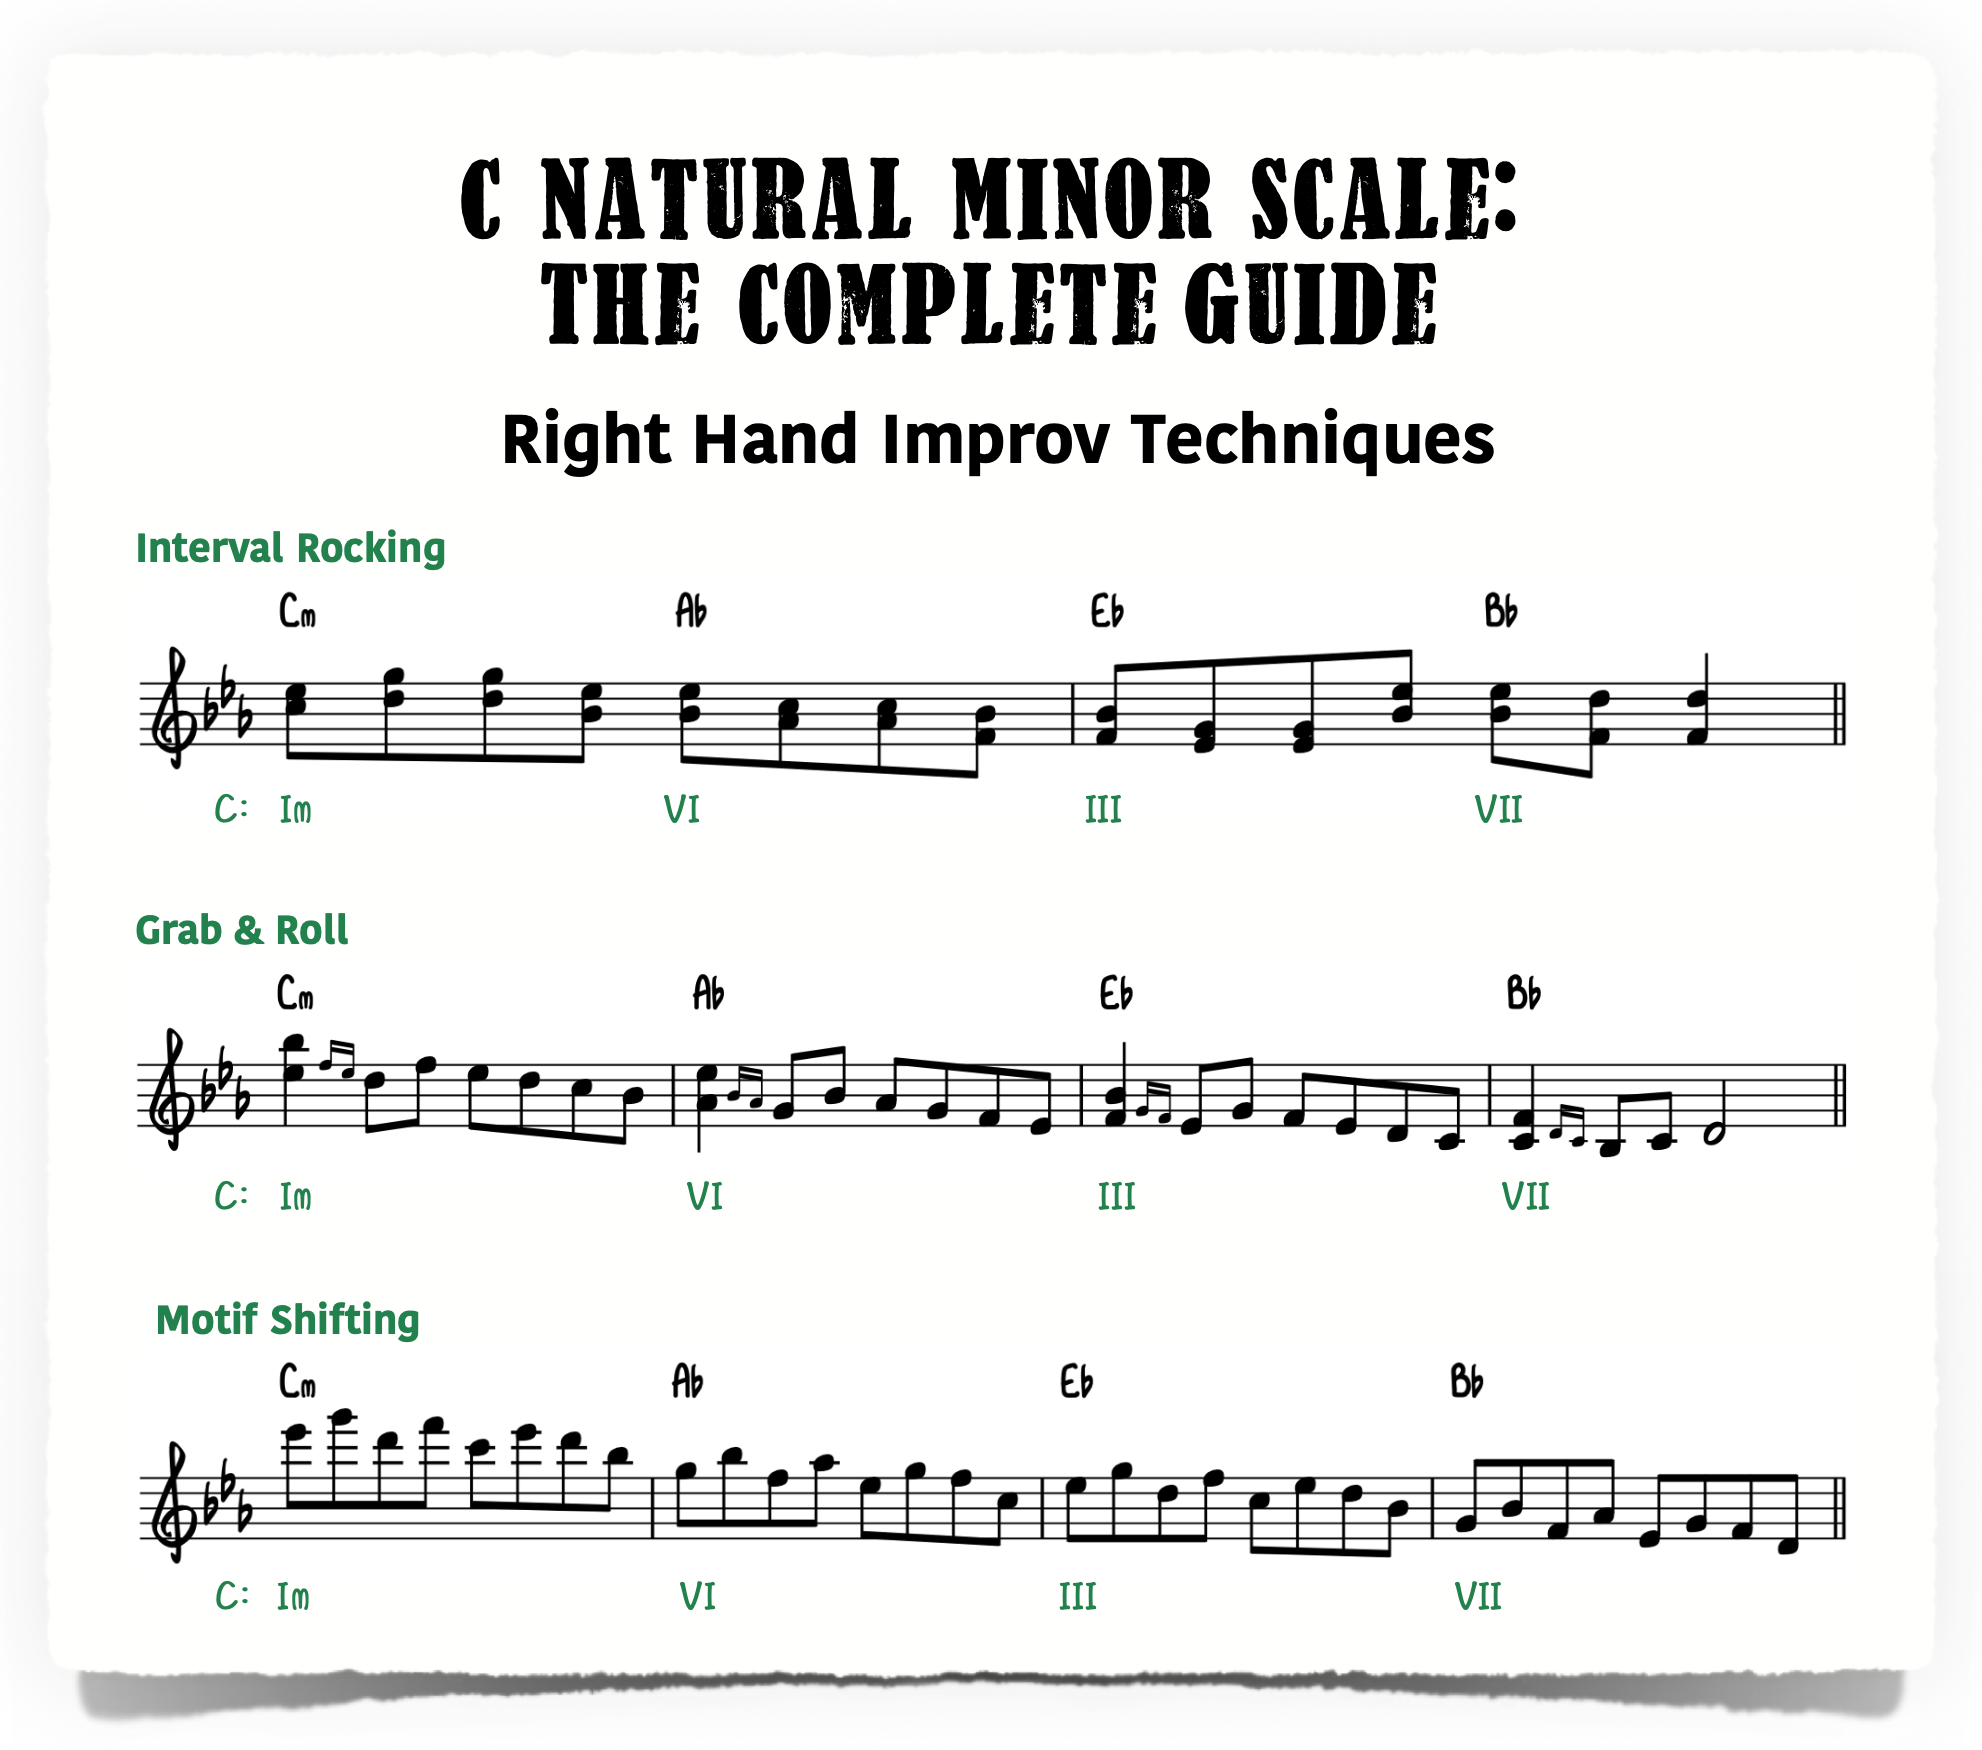
In today’s Quick Tip video, Jonny presents 3 right hand techniques that students can use to generate improv ideas that sound fantastic!
Interval Rocking
The first technique is interval rocking. Applying this technique requires 4 notes; however, there are many ways to do it. You could use a simple triad and double one chord tone, or you can use a 7th chord. You can even use interval rocking on 4-note chord voicings that contain extensions, such as rootless voicings.
One you have identified a 4-note chord shape, mentally number the notes from top-to-bottom as one, two, three and four. Next, consider the odd notes as one group and the even notes as another group. Finally, apply the interval rocking sound by alternating between the groups. In the example below, Jonny begins with the even notes, but you could also begin with the odds. Initially, it may be hard to see the groups. The following columns represent how Jonny is approaching interval rocking over this chord progression:
Cm(add9)
- G
- E♭
- D
- C
A♭(add2)
- E♭
- C
- B♭
- A♭
E♭(add2)
- B♭
- G
- F
- E♭
B♭(add4)
- E♭
- D
- B♭
- F
Interval Rocking Example

Grab & Roll
The next improv method on today’s lesson sheet PDF is what Jonny likes to call the “grab and roll” technique. He performs this technique by grabbing either a perfect 4th or a perfect 5th on beat 1, and then immediately following it with a turn or “roll” that leads into and 8th note line.
There aren’t any hard-and-fast rules regarding which chord tones to grab and roll, but Jonny generally uses a chord tone (root, 3rd, 5th, or 7th) as the top note of the grab. On the i, III and VI chords (Cm, Eb, and Ab), Jonny prefers the 3rd, 5th, and 7th on top. However, on the VII chord (Bb), Jonny likes to use the root or 5th on top. The “grab” interval is usually a 4th or 5th, mostly because that shape fits well in the hand. However, it’s also possible to “grab and roll” from a 3rd interval.
Grab & Roll Example

Motif Shifting
Jonny calls the third improv technique on today’s lesson sheet “motif shifting.” You may hear this technique referred to as a melodic sequence in more formal academic settings. However, Jonny’s terminology is helpful in explaining the creative process that is at work here. For example, he is simply playing a descending C natural minor scale using ascending melodic 3rds. But, on beat 4 in each measure, Jonny “shifts” the direction of the 3rd’s motif to a descending shape instead. This gives the line a more intriguing shape and prevents it from sounding like a finger dexterity exercise straight out of a J.B. Cramer etude.
Motif Shifting Example
Conclusion
Congratulations, you’ve completed today’s lesson on C Natural Minor Scale—The Complete Guide. As you’ve seen and heard, natural minor scales are so much more than a simple scale formula to memorize for a music theory exam. Hopefully, you’ve also learned that even beginners can have some major fun with this minor scale!
For a deep dive on the natural minor scale, check out our full-length courses on How to Improvise a Solo with the Aeolian Mode (Int, Adv).
Or, if you want to discover some other interesting sound colors, we also have dedicated improv courses on Ionian, Lydian and Mixolydian and Dorian modes.
Thanks for learning with us today! We’ll see you next time.
Would you like to comment on this lesson?
Visit this Quick Tip on YouTube
Appendix: 3 Ways to Construct Any Natural Minor Scale
There are three different methods that music students are taught to construct a natural minor scale. While each approach yields the same set of notes, the methods differ in the amount of prior knowledge needed on behalf of the student.
1. Natural Minor Scale Derived from Parallel Major
For most students, the easiest way to construct a natural minor scale is to draw on their prior knowledge of the parallel major scale—the major scale that begins on the same note. If the student already knows the parallel major scale, then the natural minor scale is easily constructed by lowering the 3rd, 6th and 7ths scale tones by a ½ step.
The natural minor scale, when compared to the parallel major, is expressed as 1–2–♭3–4–5–♭6–♭7.
PROS 👍
-
-
- This method enables a student to correctly determine the scale notes quickly…as long as they are familiar with the parallel major scale.
- The student is thinking in minor. In other words, they are conscious of each scale degrees as it relates to the minor key. (Compare with method #2 below)
-
CONS 👎
-
-
- This method won’t work for beginner students who do not know all their major scales.
- A beginner would not likely be able to use this method to determine the notes of F# natural minor because the parallel major has 6 sharps.
-
2. Natural Minor Scale Derived from Key Signature of Relative Major
Another method that music students use to construct natural minor scales is to lean on their knowledge of the relative major’s key signature. This method takes a bit longer than method #1 above. However, it is beneficial for constructing natural minor scales specifically when method #1 demands prior knowledge that the student has not yet mastered.
Here are the 3 steps to build a natural minor scale using the key signature of the relative major:
- Identify the 1st note of the natural minor scale you want to build (i.e.: F# natural minor)
- Go up three ½ steps to determine the relative major. For example, starting on F#, count upward in ½ steps: one (G♮), two (G#), three (A). Therefore, A major is the relative major of F# minor.
- Apply the key signature of the relative major, whether sharps or flats, to construct the natural minor scale. For example, A major has 3 sharps: F#–C#–G#. Therefore, the notes of F# natural minor are F#–G#–A–B–C#–D–E. Another way to say this is to play the relative major scale beginning on the 6th note.
PROS 👍
-
-
- This method is much easier to use than method #1 when the parallel major scale contains 4 or more sharps or flats
- This method works especially well when constructing natural minor scales beginning on black keys. Going up three ½ steps will guide them to the easiest enharmonic spelling. (Consider D♭ minor vs. C# minor, or G♭ minor vs F# minor)
-
CONS 👎
-
-
- This method won’t work for beginner students who do not know all their major key signatures.
- Students who use this method may not actually be thinking in minor at all! Instead, their mind is in the relative major key. As a result, they are not conscious of the scale degrees in the minor key in which they are playing.
-
3. Natural Minor Scale Formula Using Whole Steps and Half Steps
A third method that students can use to build any natural minor scales is to follow the unique arrangement of ascending whole steps and half steps that define the natural minor scale construction. For example, every natural minor scale ascends according the pattern W–H–W–W–H–W–W (Note: W=whole step; H=half step).
This method is particularly useful when a student does not have the prior knowledge needed to use method #1 or method #2. For example, let’s practice using method #3 to determine the notes of F natural minor. Remember, method #1 would require that the student already knows F major. Likewise, method #2 requires that the student already knows the key signature for A♭ major. However, method #3 enables a student to correctly build the scale without any prior knowledge. All they must know is the pattern of whole steps and half steps.
Here is the process to build a natural minor scale using the ascending pattern W–H–W–W–H–W–W:
- Start on the note F
- ascend a whole step to G
- next, go up a half step to A♭
- now go up a whole step to B♭
- take another whole step up to C
- now, go up a half step to D♭
- next, go up a whole step to E♭
- finally, go up one more whole step to F
Therefore, the F natural minor scale is F–G–A♭–B♭–C–D♭–E♭–F, according to the pattern W–H–W–W–H–W–W.
PROS 👍
-
-
- This method does not require any prior knowledge of relative and parallel scales and key signatures.
- This method draws the student’s attention to the sound and location of the ½ steps within the scale’s formation.
-
CONS 👎
-
-
- This is the slowest of the 3 methods.
- The student must accurately recall the pattern W–H–W–W–H–W–W.
- This method does not aid the student in making associations between parallel and relative keys.
-
As you can see, there is an appropriate time and place for each of the 3 methods above in the student’s educational journey. Therefore, students should not lean exclusively on just one approach. In fact, each method assists the student in making critical discoveries about how musical sounds are organized and related.
Introductory images created with the assistance of DALL·E 2.
 Writer
Michael LaDisa
Michael LaDisa graduated from the University of North Texas with a major in Music Theory & Composition. He lives in Chicago where he operates a private teaching studio and performs regularly as a solo pianist. His educational work with students has been featured on WGN-TV Evening News, Fox 32 Good Day,...
More Free Lessons

In this lesson, I'm breaking down exactly which scales work best over major chords and minor chords—and the best part is that I'll give you options based on your playing level.
In this lesson, I'll break down the same jazz tune at three different levels and show you exactly what separates a beginner, intermediate, and advanced jazz player.
Today’s lesson is a very serious and scientific exploration into what your favorite chord says about your personality.
Looking for downloads?
Subscribe to a membership plan for full access to this Quick Tip's sheet music and backing tracks!
Join Us
Get instant access to this Quick Tip and other member features with a PWJ membership!
Guided Learning Tracks
View guided learning tracks for all music styles and skill levels
Progress Tracking
Complete lessons and courses as you track your learning progress
Downloadable Resources
Download Sheet Music and Backing Tracks
Community Forums
Engage with other PWJ members in our member-only community forums
Become a better piano player today. Try us out completely free for 14 days!
