It Came Upon a Midnight Clear Jazz Waltz Piano
Learning Focus
Music Style
Free Lessons
Get free weekly lessons, practice tips, and downloadable resources to your inbox!
Are you looking for a way to spice up ‘It Came Upon A Midnight Clear’ with a jazz piano style? In today’s Quick Tip, you will learn Jonny’s jazz piano waltz arrangement of this classic Christmas tune in 3 easy steps:
- Learn the melody
- Learn and explore the harmony with the left hand
- Add fun melodic embellishments to make it your own
Feel free to follow along with our Smartsheet, where you can change the key, tempo, and even loop sections for practice. Let’s get started!
Step 1: It Came Upon a Midnight Clear Jazz Piano Melody
The most important part of any song is the melody, so I find it’s always good to start with that. Another way of thinking about the melody is it’s the part of the song you sing! Before we dig in let’s take a look at the entire melody:
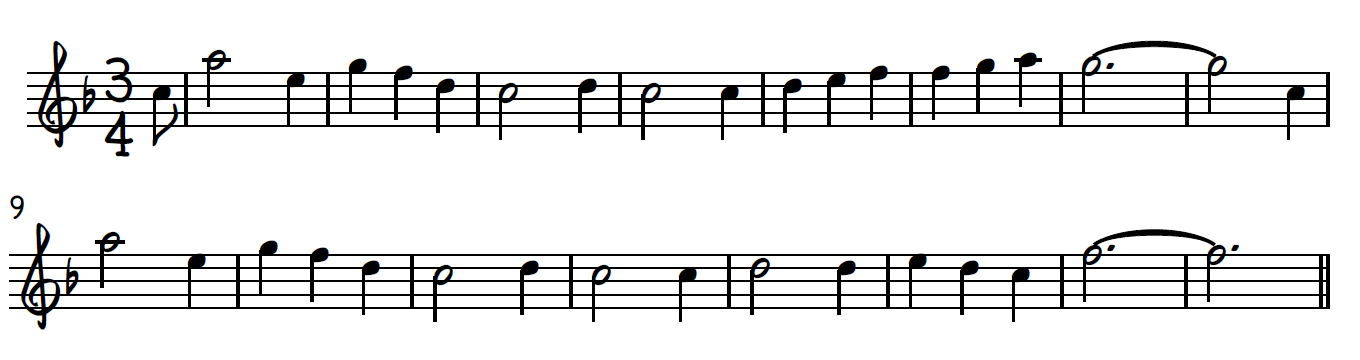
As you can see, this melody is fairly simple. Instead of tackling the entire thing, let’s break it up into four measure sections. Here’s the first section:

You’ll notice that I added some fingering suggestions here. As a general rule, when you have large leaps (from C to A for example) use your thumb on the lowest note and pinky on the highest note. If my fingering is uncomfortable for you, that’s fine! These are merely suggestions, and I encourage you to experiment with your own fingerings that feel good. Try to anticipate how the melody moves and adjust your fingering accordingly.
Here are the next four measures:

This section of the melody should be easier to play since it mostly moves step-wise (meaning the notes move up or down the scale) and ends with a nice dotted half note tied into the next measure. Check out the next four measures:

It’s the same as the first four measures! Now for the last four:

This is probably the easiest section of the whole melody! Practice each piece slowly and correctly, then put them together. Make sure you can play the melody all the way through before moving on. Next, let’s learn the left hand part.
Step 2: Left Hand Harmony
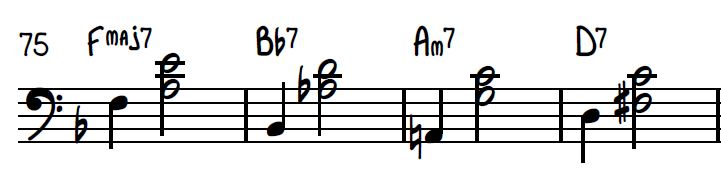
While the melody is the most important part of any song, the harmony is what makes it sound interesting! Just like with the melody, let’s look at the whole left hand part before we break it up:

Rhythmically, this part is very simple which is great because we are going to be jumping around a little bit! Let’s start with the first four measures:

One of the things that gives jazz its unique sound is its use of 7ths in all the chords. 7th chords typically have four notes (root, 3rd, 5th, and 7th) but in this arrangement we will only be using three. Each chord leaves out the 5th, because to establish chord quality (whether a chord is Major 7, dominant 7, or minor 7) we need to hear the root, 3rd, and 7th only. Try playing 7th chords by leaving out either the 3rd or 7th; you’ll find it doesn’t sound the same!
Practice the first four bars as written to get a feel for jumping between the root and the 3rd & 7th of each chord. Once you can get through the first for bars, the rest of the left hand part is easy! Let’s look at the next four measures:

These four measures utilize sus chords (suspended chords). This means that instead of playing the 3rd, we play the 4th instead. By playing the 4th of the chord, it creates a floating, “suspended” sound. Once you have these down, the next four bars are the same as the first four!
Now let’s look at the final four measures:

As you can see, these last four measures are the easiest in the whole arrangement! As before, practice each section on its own until you can play it. Once you can do that put the whole thing together, then practice playing both hands together. You’ll be able to play it in no time! Next, let’s look at some embellishment ideas you can use to personalize this song.
Step 3: Adding Embellishments
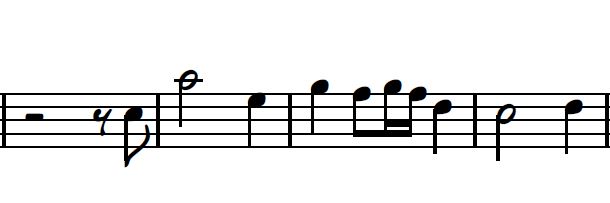
You can be as creative as you want with these! We won’t dive into too much detail as the possibilities are endless, but we’ll go over a couple ideas to get you started. The first idea is using turns between melody notes, like this:

You can use this virtually anywhere throughout the melody! Here’s another place you could use a turn:
Feel free to practice using turns throughout the melody. Another idea is using the Major blues scale to improvise a little bit over the longer notes. Here’s the Major blues scale in F:

If you want to improvise an embellishment while playing the melody, stick to using this scale over long notes at the end of phrases. This will give you enough time to play your idea and still be able to come back to the melody in time. Have fun with it!
If you’d like to learn the full jazz piano arrangement of It Came Upon a Midnight Clear, check out our It Came Upon A Midnight Clear – Waltz 1 and It Came Upon A Midnight Clear – Waltz 2 courses.
If you want to dive into more detail in the topics covered today, check out our Intermediate Piano Foundations learning track to learn more about chord quality. You can also check out The Major Blues Scale (Gospel Scale) 1 and The Major Blues Scale (Gospel Scale) 2 courses for more in depth explorations of the Major blues scale.
Thanks for learning, and see you in the next Quick Tip!
Blog written by Austin Byrd // Quick Tip by Jonny May
More Free Lessons

In this lesson, I'm breaking down 5 of Ray Charles’ signature blues licks that you can start using right away.
In this lesson, I'm taking the exact same scale and showing how three simple ideas can make it sound completely different.
In this lesson, I’ll show you three techniques that show up again and again in Billy’s playing—and you can start using them in your own music right away.
Looking for downloads?
Subscribe to a membership plan for full access to this Quick Tip's sheet music and backing tracks!
Join Us
Get instant access to this Quick Tip and other member features with a PWJ membership!
Guided Learning Tracks
View guided learning tracks for all music styles and skill levels
Progress Tracking
Complete lessons and courses as you track your learning progress
Downloadable Resources
Download Sheet Music and Backing Tracks
Community Forums
Engage with other PWJ members in our member-only community forums
Summer Special
Get up to 50% OFF the PWJ Membership!! **Expires August 3rd, 2026
