Fly Me to the Moon Jazz Piano
Learning Focus
Music Style
Free Lessons
Get free weekly lessons, practice tips, and downloadable resources to your inbox!
Do you want to learn how to play one of the most famous jazz songs of all time, Fly Me to the Moon, on piano? This tune has been recorded thousands of times by many famous artists, but the best known version is by Frank Sinatra. In this approach, you will learn how to play this great song in 4 easy steps:
- Learn the melody / lead sheet
- Drop guide tones / chord shells
- Stock groove
- Melodic embellishments
Let’s start by learning the melody from the lead sheet!
Step 1: Fly Me to the Moon Piano – Lead Sheet
The first (and most important) step to learning any song is to start with the melody. The melody is the part of the song you sing, and is what makes every song unique and easy to identify. We will be learning the first phrase of this song in today’s lesson:

Practice this melody hands separately. Try to resist the urge to play the same rhythm with both hands at the same time. There’s nothing wrong with playing jazz this way, but if you can do different things with each hand you will sound much more polished.
If you find yourself always playing the same rhythm with both hands, try an independence exercise to train your hands to play apart. Play the melody with your right hand like you normally would, but instead of playing the same rhythm with your left hand, play whole note chords underneath.
It might be hard at first. Take it slow and stick with it until you feel comfortable with this exercise. You’ll be glad you did! Next, let’s learn how to play the chords using drop guide tones.
Step 2: Drop Guide Tones
The easiest way to navigate through chord changes is by using guide tones. We call them drop guide tones in this lesson because one or both notes will move down by a whole or half step. Another way to think of these is chord shells. Each of these shells is made of the 3rd and 7th of each chord. Try playing through the whole sequence and pay attention to how the notes move as you go from chord to chord:

Using this approach is better than playing each chord in root position for two reasons: you have to worry about less notes, and it sounds clearer and more polished! Focus on the fact that each chord shell uses the 3rd and 7th of each chord if you’re confused why this sound works. The 3rd and 7th of the chord gives us the chord quality (whether a chord is Major 7, minor 7, or dominant 7).
If you want to learn more about chord shells, check out our Chord Shell & Guide Tone Exercises course. Once you feel comfortable using drop guide tones, let’s move on to the stock groove.
Step 3: Stock Groove
Every style of music has a distinctive groove that distinguishes it from other styles. For jazz, that groove is swing. To create a swing groove, we have to play some rhythms that emphasize off-beats. Here is the stock groove for swing:

As you can see, we start with the root of each chord on beat 1, then the chord shell on the “and” of 2. This anticipated chord is what helps give swing its energy and groove. Practice playing this stock groove at a few different tempos to get the feel of it. If you put a slight emphasis on the and of 2, it will help your groove swing even more!
Once you’re comfortable with the stock groove, try adding an anticipatory note on the and of 4 before the next chord:

This anticipatory note is going to be the 5th of the next chord. For example, when moving from Am7 to Dm7, use A to lead into Dm7. A is the 5th of Dm7 and this sound will not only provide more swing and groove, but help lead the ear into hearing the next chord. Once you’re comfortable playing this groove with the anticipations, let’s learn the last step: melodic embellishments.
Step 4: Melodic Embellishments
An embellishment is a little bit of extra music you can play between the main notes of a melody. They are a huge part of what makes jazz sound like jazz! We are going to use two embellishments: adding a 6th and a turn between melody notes.
To make the 6th embellishment work, add a note a 6th below the first melody note of each measure. To find the 6th, start with the original note and count down 6 notes. Remember to always count the original note as 1! Play the 6th between beats 1 and 2. This will help you to swing the melody a little more, and it sounds more appropriate for jazz.
A turn is an embellishment that adds a note above the original note, then quickly moves down two notes. This all happens within the span of an eighth note, so it moves fast! Here’s the melody with our two embellishments:
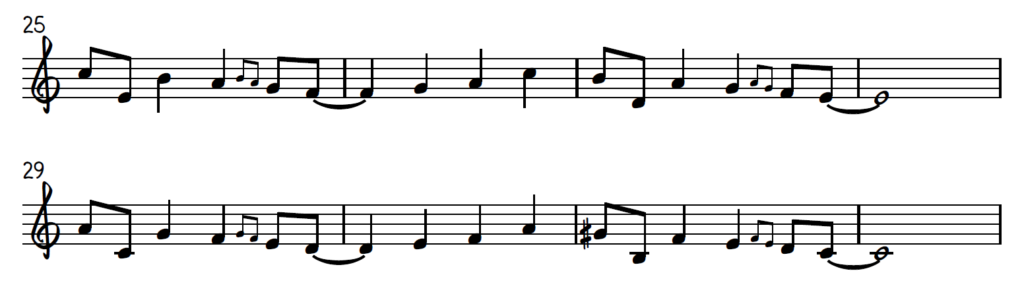
Practice slowly until you feel comfortable playing the embellishments. Use a metronome to keep your rhythm reliable and accurate. Once you get this down, you will love the way you sound when playing jazz tunes! Next, let’s put it all together.
Fly Me to the Moon Piano: Putting It All Together
Once you can play the stock groove and the melodic embellishments with ease, it’s time to combine both parts:

This may be difficult to put together at first because there are a lot of different parts. Remember to practice each part separately until you’ve mastered it, then slowly put it all together.
If you want to keep learning the rest of this tune, check out our Fly Me To The Moon 1 and Fly Me To The Moon 2 courses where you’ll learn how to create a full swinging arrangement of this great song.
Thanks for learning, and see you in the next Quick Tip.
Blog by Austin Byrd / Quick Tip by Jonny May
More Free Lessons

Do your improv lines sound aimless? Develop authentic jazz language with bebop scales used by legends like Charlie Parker and Dizzy Gillespie!

John Proulx demonstrates how to adopt Stevie Wonder's beloved classic "You Are the Sunshine of My Life" for solo piano.
A complete guide to understanding and applying the concept of guide tones for the beginner jazz piano student.
Looking for downloads?
Subscribe to a membership plan for full access to this Quick Tip's sheet music and backing tracks!
Join Us
Get instant access to this Quick Tip and other member features with a PWJ membership!
Guided Learning Tracks
View guided learning tracks for all music styles and skill levels
Progress Tracking
Complete lessons and courses as you track your learning progress
Downloadable Resources
Download Sheet Music and Backing Tracks
Community Forums
Engage with other PWJ members in our member-only community forums
Become a better piano player today. Join with the 14-Day Free Trial today!
