#1 Piano Exercise for Speed, Strength, & Control
Learning Focus
Music Style
Free Lessons
Get free weekly lessons, practice tips, and downloadable resources to your inbox!
Are you looking for a way to easily enhance your facility at the piano? Do you want to learn how to play faster, quickly? In today’s Quick Tip you will learn Jonny’s Magic Exercise to comfortably learn how to play piano faster in three easy steps:
- Learn the right hand pattern
- Add the left hand rhythmic pattern
- Learn to play the exercise hands together going up and down
I love this exercise because it’s a beautiful, musical way to practice technique. Let’s start by learning the right hand.
Step 1: Magic Piano Exercise Right Hand
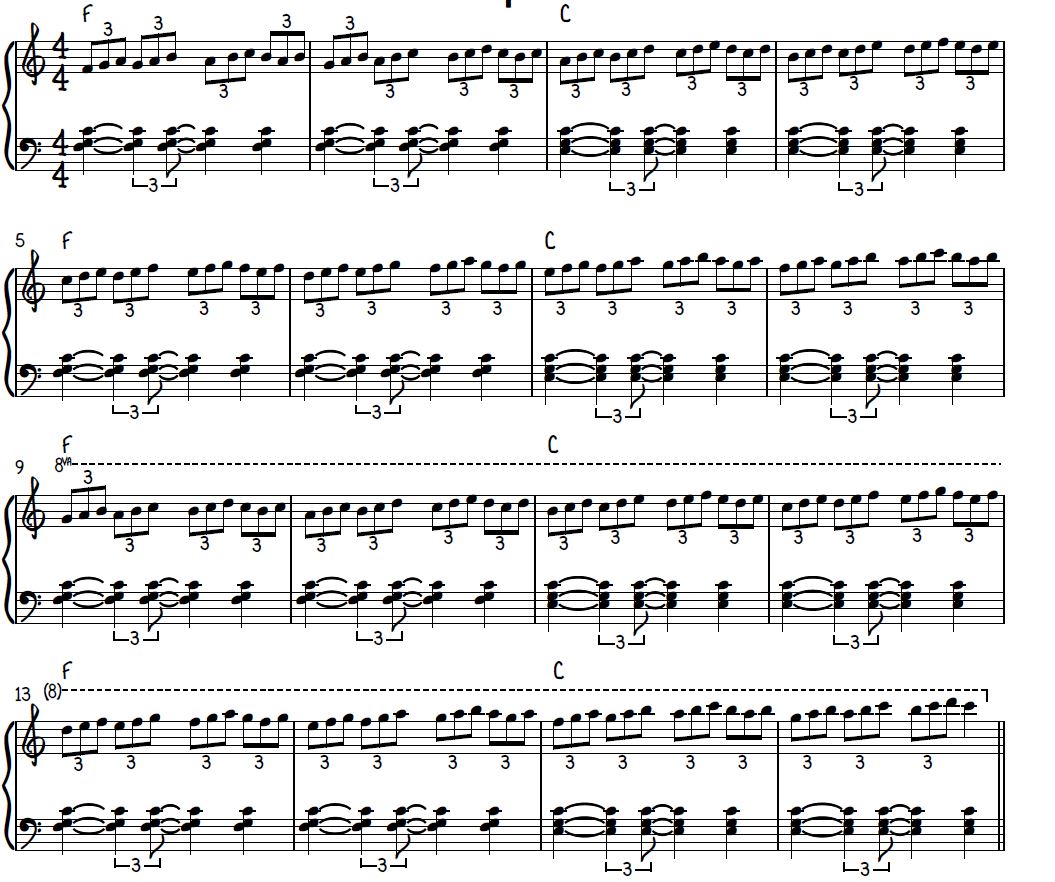
Let’s start by taking a look at the first four measures:

This pattern is going to repeat up the keyboard until we get to the second highest C on the piano. Start by positioning your hand with your thumb on F, index finger on G, middle finger on A, ring finger on B, and pinky on C. For the rest of this Quick Tip, we’ll use finger numbers for simplicity and clarity.
Try playing the first measure slowly, and pay attention to the fingering. Use 1-2-3 2-3-4 3-4-5 4-5-4. This will force you to focus on finger dexterity and accuracy, which are both key elements to playing fast! Once you can play through the first measure, move your hand up one key so that 1 is on G, and repeat the pattern. Do the same for measure 3 with 1 on A, and again with 1 on B. By now, you should be getting fairly comfortable with this pattern!
Before we continue, it’s critical to talk about technique and posture, since using poor posture or technique will not only make this exercise difficult, it can actually lead to injury.
POSTURE
Make sure you are sitting on the front half of your bench or chair. This will help promote a straight back and prevent hunching, which can lead to all kinds of technique problems. Keep your shoulders down and relaxed (this is something you should be checking at regular intervals. Shoulders have a tendency to creep up without us even knowing as we play!). Make sure the edge of the piano is directly above your knees so that you’re not sitting too close or too far from the keyboard. Your arms should approach the keyboard at a natural angle, elbows not sticking out or staying too close to your body. You should be able to draw a straight line from your elbows to the first knuckles on each hand. If you can, that means your wrists are in a good neutral position and it will be much easier to play the keys.
TECHNIQUE
Once your posture is in order, take a look at your fingers. Your fingers should have a natural curve to them and the pads of your fingertips should be touching the keys. It’s very helpful to have short fingernails for piano playing! It’s not necessary to trim your nails short, but it can help your technique if that’s something you struggle with. If you’re not sure if your fingers are curved correctly, try this: turn your hands upside down on the keys and straighten all your fingers. Then, simply relax your fingers. You’ll notice that each finger naturally curves inward. In this position, simply turn your hands over so your fingers touch the keys, and maintain that position as you play.
MOVING ON
Now that you can play through the first four measures with your right hand, continue practicing the pattern up the piano until you get to the end of the exercise. While focusing on finger dexterity, make sure your rhythm is solid. We’ll be using triplets for the entire exercise, and using accurate time is important, especially as we speed up the tempo! Now that you can play through the whole thing, let’s move on to the left hand part.
Step 2: Magic Piano Exercise Left Hand
The left hand part is the easiest part of this exercise, but the rhythm can be a little tricky! There are only two chords; here they are:

The first chord is Fsus2, and the second is a simple C Major triad in first inversion. A sus2 chord is a type of suspended chord, where we move the 3rd of the chord (in this case, A) to either the 2nd (G) or 4th (Bb). Sus2 indicates the 3rd moving to the 2nd, so our chord is F-G-C. The second chord is spelled E-G-C. Easy, right?
The rhythm here is key. Subdivide triplets as you play through this, and focus on when exactly each chord is struck. You’ll only play each chord three times per measure: once on beat 1, once on beat 4, and once on the last triplet of beat 2. Practice this slowly until you can get it down! Then, repeat the same rhythm for the C Major chord. That’s it for the whole left hand part! Once you can play these two chords with the rhythm, let’s put this piano exercise together.
Step 3: Magic Piano Exercise Hands Together Ascending and Descending
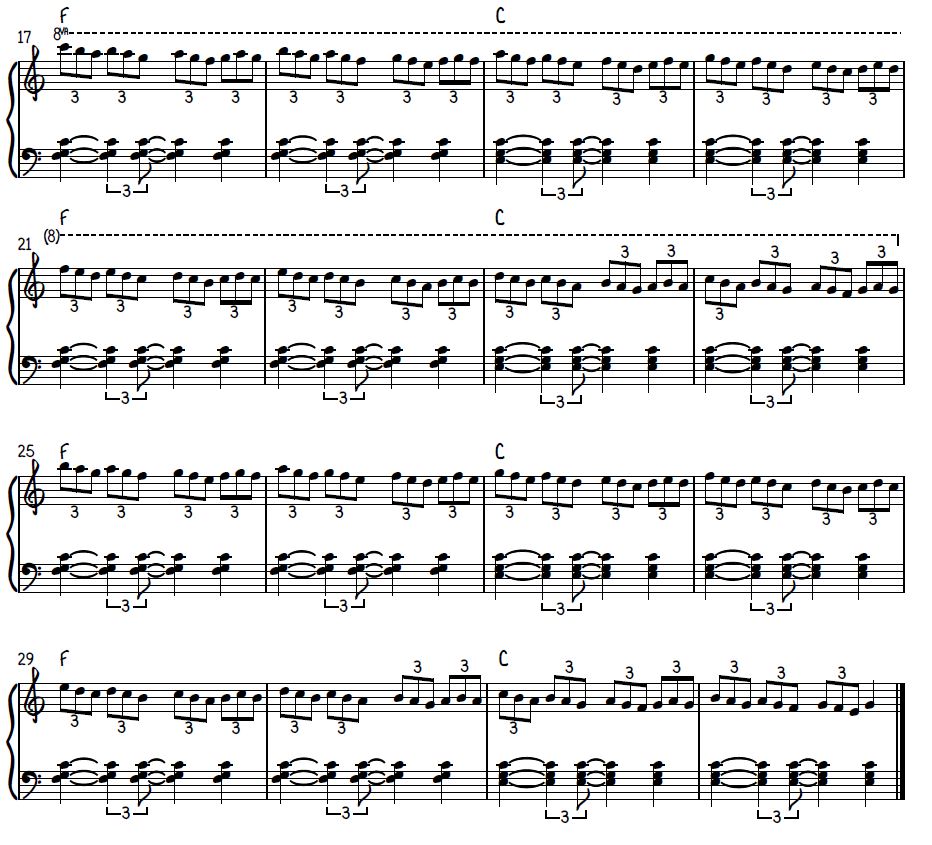
Now that you can play both parts independently, let’s put the whole thing together now:
As always, start by going slowly and making sure the left hand rhythm lines up with the right hand. Keep going until you can play the whole thing going up, and give yourself a pat on the back for making it this far! Now, the last step is to reverse the exercise and go down.
Descending, the left hand stays the same! For the right hand, we are going to maintain the same hand position, but instead of starting on 1 we will start on 5. Use the fingering 5-4-3 4-3-2 3-2-1 2-1-2 and move down one key each measure. Repeat this pattern until you get to the very end, where we will simply end of G on beat four of the last measure. This is so that the last chord has a nice consonant sound.
Once you can go through the whole exercise ascending and descending, start speeding up the tempo! There’s no limit – feel free to go as fast as you want (gradually, of course)!
If you want to dig into more technique exercises, check out our Two-Hand Coordination Exercises 1 and Two-Hand Coordination Exercises 2, Endless Epic Chords 1 and Endless Epic Chords 2 courses.
Thanks for learning, and see you in the next Quick Tip!
Blog written by Austin Byrd // Quick Tip by Jonny May
More Free Lessons

Do your improv lines sound aimless? Develop authentic jazz language with bebop scales used by legends like Charlie Parker and Dizzy Gillespie!

John Proulx demonstrates how to adopt Stevie Wonder's beloved classic "You Are the Sunshine of My Life" for solo piano.
A complete guide to understanding and applying the concept of guide tones for the beginner jazz piano student.
Looking for downloads?
Subscribe to a membership plan for full access to this Quick Tip's sheet music and backing tracks!
Join Us
Get instant access to this Quick Tip and other member features with a PWJ membership!
Guided Learning Tracks
View guided learning tracks for all music styles and skill levels
Progress Tracking
Complete lessons and courses as you track your learning progress
Downloadable Resources
Download Sheet Music and Backing Tracks
Community Forums
Engage with other PWJ members in our member-only community forums
Become a better piano player today. Join with the 14-Day Free Trial today!
